

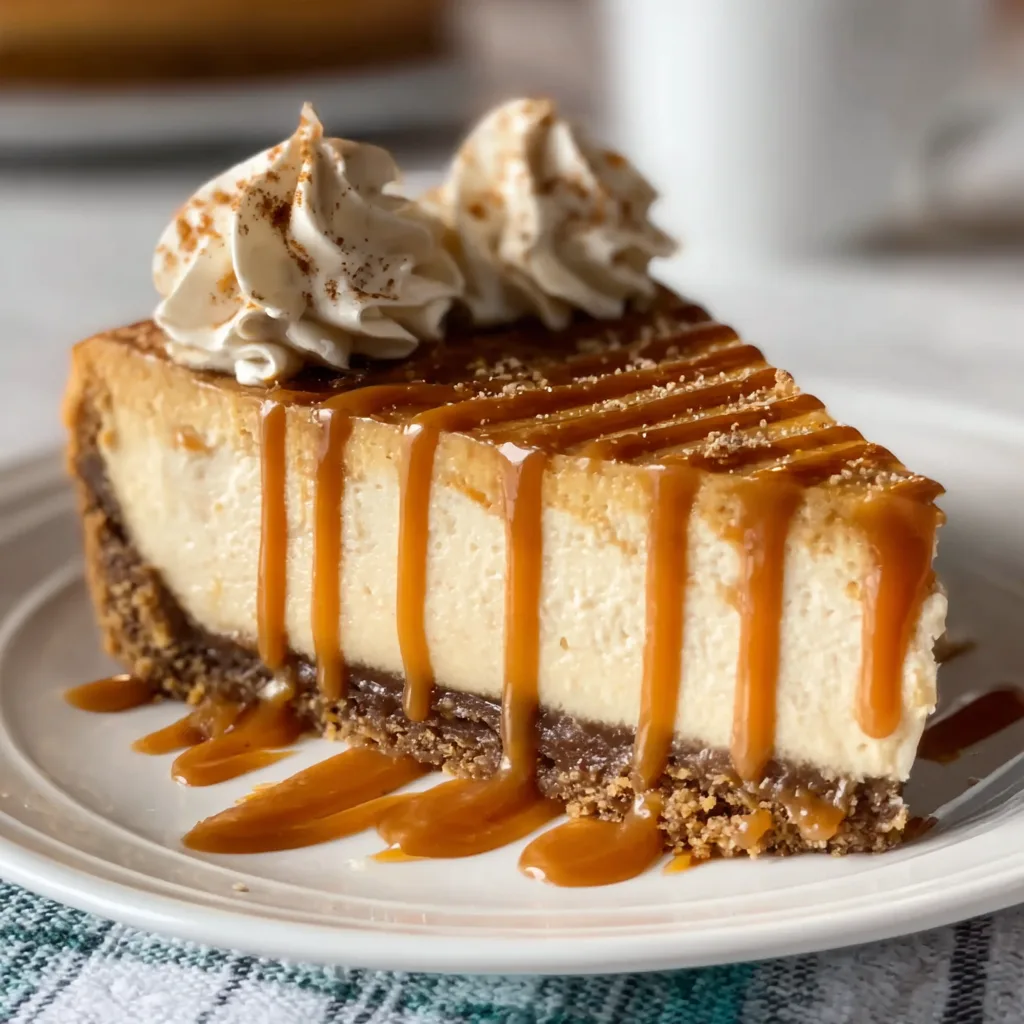
This Caramel Macchiato Cheesecake Recipe combines two of my greatest loves: rich, creamy cheesecake and the bold, sweet flavors of my favorite coffee shop indulgence. The moment you slice into this decadent creation, you’ll discover layers of velvety cheesecake infused with espresso, topped with buttery caramel that cascades down the sides. I’ve spent years perfecting this recipe, making it foolproof even for cheesecake beginners. The coffee-caramel aroma that fills your kitchen while baking is absolutely intoxicating! Ready to create a showstopper dessert that’ll have everyone begging for seconds? Let’s dive in.
Table of Contents
Recipe
Print
Delicious Caramel Macchiato Cheesecake Recipe
- Prep Time: 25 minutes
- Cook Time: 1 hour 5 minutes
- Total Time: 5 hours 30 minutes
- Yield: 12 servings
- Category: Dessert
- Method: Baking
- Cuisine: American
- Diet: Vegetarian
Description
Delicious Caramel Macchiato Cheesecake Recipe is an easy, creamy, and indulgent dessert packed with rich espresso flavor, silky cheesecake filling, buttery cookie crust, and sweet caramel drizzle. This coffeehouse-inspired cheesecake delivers the perfect balance of creamy texture and bold caramel macchiato flavor for special occasions or cozy dessert nights.
Ingredients
2 cups chocolate cookie crumbs
5 tablespoons melted butter
24 ounces cream cheese, softened
1 cup granulated sugar
3 large eggs
1/2 cup sour cream
1 tablespoon instant espresso powder
1 teaspoon vanilla extract
1/4 cup brewed coffee, cooled
1/2 cup caramel sauce
Whipped cream for garnish
Chocolate shavings for topping
Instructions
1. Preheat the oven to 325 degrees Fahrenheit.
2. Grease a 9-inch springform pan lightly with butter.
3. Mix chocolate cookie crumbs and melted butter in a bowl until combined.
4. Press the crumb mixture firmly into the bottom of the springform pan.
5. Beat cream cheese and granulated sugar in a large bowl until smooth and creamy.
6. Add eggs one at a time and mix well after each addition.
7. Mix in sour cream, espresso powder, vanilla extract, and brewed coffee until smooth.
8. Pour the cheesecake filling over the crust evenly.
9. Bake for 55 to 65 minutes until the center becomes slightly set.
10. Turn off the oven and let the cheesecake cool inside with the oven door slightly open for 1 hour.
11. Refrigerate the cheesecake for at least 4 hours or overnight.
12. Drizzle caramel sauce over the cheesecake before serving.
13. Top with whipped cream and chocolate shavings.
Notes
Use room temperature cream cheese for the smoothest texture.
Do not overmix the batter to prevent cracks.
Chill the cheesecake overnight for the best flavor and consistency.
Add extra espresso powder for a bolder coffee flavor.
Store leftovers covered in the refrigerator for up to 5 days.
Why You’ll Love This Caramel Macchiato Cheesecake Recipe
Perfect Balance of Flavors
The magic of this cheesecake lies in its perfectly balanced flavors. The espresso-infused filling delivers that distinctive coffee punch without overwhelming your palate. Each bite starts with the buttery graham cracker crust, followed by the velvety coffee cheesecake middle, and finishes with a sweet caramel topper that melts in your mouth. I’ve carefully calibrated the sweetness so it complements rather than competes with the coffee notes. The result? A sophisticated dessert that tastes like it came from an upscale bakery but was made right in your kitchen!
Impressive Yet Achievable
Don’t let the elegant appearance fool you—this recipe is totally doable for home bakers. I’ve broken down each step to be approachable, even if you’ve never made cheesecake before. The water bath technique might sound fancy, but I’ll walk you through it simply. The marbled caramel topping creates a stunning visual effect that looks complicated but actually requires minimal artistic skill. Plus, the recipe uses ingredients you likely already have or can easily find. Your friends will think you spent hours laboring when it’s really about simple techniques executed well.
Essential Tips & Tricks
Mastering the Water Bath
The water bath is your secret weapon for achieving that perfectly smooth, crack-free cheesecake surface. Here’s my foolproof method: wrap your springform pan in three layers of heavy-duty aluminum foil, ensuring no water can seep in. Place the wrapped pan in a larger roasting pan, then pour hot water halfway up the sides of the springform. This gentle, moist heat prevents the dreaded center crack and creates that silky texture we’re after. If you’re nervous about leaks, place the springform in a slightly larger cake pan before putting it in the water bath—it’s my favorite backup technique.
Temperature Control Is Key
The biggest mistake in cheesecake making? Rushing the temperature changes. Start with room temperature ingredients—especially the cream cheese and eggs. Cold ingredients create lumps that never fully incorporate. After baking, resist the urge to immediately remove your masterpiece from the oven. Instead, turn off the heat, crack the oven door, and let it cool gradually for an hour. Then let it rest at room temperature before refrigerating overnight. This slow cooling prevents the dreaded center sink and surface cracks. Patience here translates directly to texture perfection!
Serving Ideas & Creative Variations
Elegant Presentation Options
Transform this already impressive dessert into a true showstopper with thoughtful presentation touches. Dust the top with cocoa powder using a small sieve for a professional finish, or add chocolate-covered espresso beans around the perimeter. For special occasions, I love creating a caramel cage by drizzling cooled caramel in patterns over parchment paper and carefully placing it on top once set. Serve each slice on a plate with a small swirl of whipped cream and a drizzle of fresh caramel. The contrast of temperatures—cold cheesecake with warm caramel sauce—creates a sensory delight that elevates the entire experience.
Seasonal Adaptations
This versatile recipe welcomes seasonal twists that keep it exciting year-round. For fall, add a tablespoon of pumpkin spice to the filling and garnish with crushed gingersnaps. Winter holidays call for peppermint extract and crushed candy canes on top. Spring? Try adding lemon zest to brighten the flavor profile. Summer brings opportunities for fresh berry toppings that cut through the richness. You could even transform this into mini cheesecakes using a muffin tin for perfect individual servings—just like these delicious Salted Caramel Pretzel Cheesecake Balls but with our macchiato twist!
Storage & Troubleshooting Guide
Proper Storage Techniques
To maintain that perfect texture and flavor, proper storage is essential. Once completely cooled, refrigerate your cheesecake uncovered for about 30 minutes to set the surface, then cover with plastic wrap or place in an airtight container. It will keep beautifully for up to 5 days in the refrigerator. For longer storage, you can freeze individual slices wrapped tightly in plastic wrap, then aluminum foil. Thaw overnight in the refrigerator for the best texture restoration. I recommend adding the caramel topping fresh after thawing for the most beautiful presentation and to prevent the caramel from becoming too firm.
Fixing Common Issues
Even experienced bakers encounter challenges! If your cheesecake cracks despite the water bath, don’t panic—this is the perfect opportunity to showcase your caramel topping as a delicious disguise. For a sunken center, a generous pile of whipped cream or extra caramel works wonders. If your crust gets soggy from a leaky water bath, simply place the cheesecake (still in its pan) in a 350°F oven for 5 minutes to crisp it up before chilling. And if your caramel seizes or crystallizes, add a splash of heavy cream and gently rewarm it while stirring constantly—it’ll smooth right out.
Frequently Asked Questions
Can I make this Caramel Macchiato Cheesecake Recipe without a springform pan?
Yes! Use a regular cake pan lined with parchment paper with extra hanging over the sides to help lift it out after cooling. The presentation won’t be as clean, but the flavor will be identical.
How far in advance can I make this cheesecake?
You can make it up to 3 days ahead and store in the refrigerator, or freeze for up to a month. Add the caramel topping just before serving for the freshest look and taste.
Can I use instant espresso powder instead of brewed espresso?
Absolutely! Dissolve 2 tablespoons of instant espresso powder in 2 tablespoons of hot water. This creates a more concentrated coffee flavor that stands up well to baking.
What’s the best type of caramel to use?
Homemade is ideal for the richest flavor, but store-bought caramel sauce works too. Choose a thick, high-quality sauce that won’t run too much when slightly warmed.
Can I make this recipe without the coffee flavor?
Yes! Simply omit the espresso and increase the vanilla extract to 2 teaspoons. You’ll have a delicious vanilla caramel cheesecake instead.
Final Thoughts
This Caramel Macchiato Cheesecake Recipe has become my signature dessert for good reason—it strikes that perfect balance between impressive and achievable. The combination of creamy coffee-infused filling and buttery caramel creates a dessert that feels both familiar and special. I love seeing the looks on people’s faces when they take that first bite and experience all those flavors working together in perfect harmony. For more delicious inspiration, check out my Pinterest board where I’m always sharing new flavor combinations and techniques!