

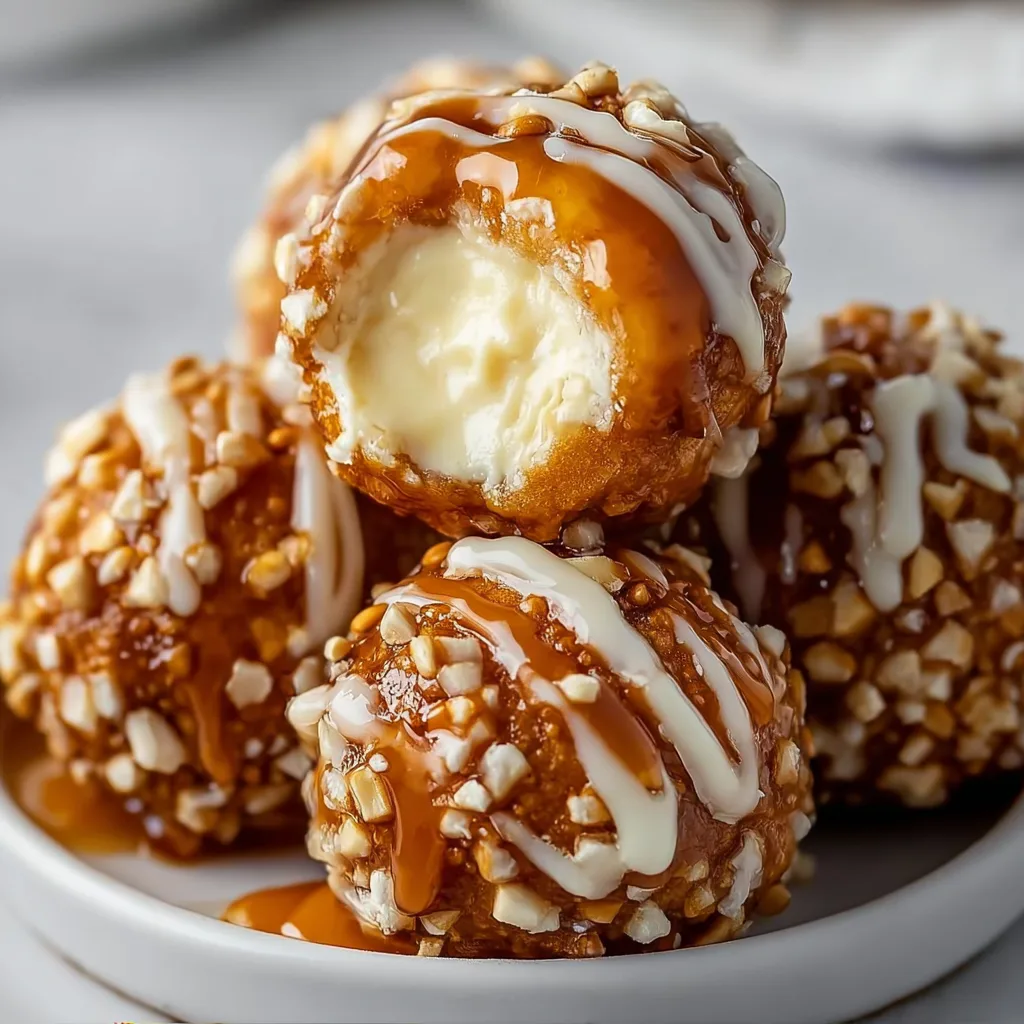
Salted Caramel Pretzel Cheesecake Balls are the perfect bite-sized indulgence when you’re craving something sweet, salty, and utterly decadent. These little treasures combine the creamy richness of cheesecake with the buttery crunch of pretzels and the gooey sweetness of caramel. I’ve been making these for years, and they never fail to disappear within minutes at any gathering. The contrast of textures and flavors creates such a satisfying experience that you’ll find yourself reaching for “just one more” every time. If you love the classic sweet-salty combo like my New York Cheesecake with Berry Twist, these balls will become your new obsession.
Table of Contents
Recipe
Print
Irresistible Salted Caramel Pretzel Cheesecake Balls Recipe | Easy & Delicious Dessert
- Prep Time: 20 minutes
- Cook Time: 0 minutes
- Total Time: 1 hour (includes chilling)
- Yield: 24 balls
- Category: Dessert, No-Bake
- Method: No-Cook
- Cuisine: American
- Diet: Vegetarian
Description
These salted caramel pretzel cheesecake balls are the perfect no-bake dessert: creamy, crunchy, sweet, and salty all in one bite! Made with crushed pretzels, caramel sauce, and cream cheese, then coated in chocolate and chilled until firm. They’re bite-sized bliss for parties or freezer treats!
Ingredients
8 oz cream cheese, softened
1/3 cup caramel sauce (plus extra for drizzle)
1 1/2 cups crushed pretzels
1/2 tsp sea salt
1/2 tsp vanilla extract
1 1/4 cups crushed graham crackers
12 oz semisweet or dark chocolate, melted
Flaky sea salt, for garnish
Instructions
1. In a mixing bowl, beat softened cream cheese until smooth.
2. Add caramel sauce, vanilla, sea salt, and mix until well combined.
3. Fold in crushed pretzels and graham cracker crumbs. Chill mixture for 30 minutes.
4. Scoop and roll into 1-inch balls. Place on a parchment-lined baking sheet and freeze for 20 minutes.
5. Dip each ball into melted chocolate using a fork. Tap off excess and place back on baking sheet.
6. Drizzle with extra caramel and sprinkle with flaky sea salt before chocolate sets.
7. Chill until firm and store in fridge or freezer.
Notes
• Use gluten-free pretzels for a GF version.
• Add chopped pecans or mini chocolate chips for a crunch twist.
• Store in the fridge for up to 5 days or freeze for longer storage.
Why You’ll Love These Salted Caramel Pretzel Cheesecake Balls
Perfect Balance of Flavors
There’s something almost magical about the combination of sweet and salty in these cheesecake balls. The tangy cream cheese base provides the perfect canvas for the rich caramel swirls, while the crushed pretzels add that satisfying salty crunch that keeps you coming back for more. I love watching people’s faces light up when they bite into one – that moment when the creamy cheesecake melts on their tongue, followed by the buttery caramel and the surprising crunch of pretzel pieces. It’s a flavor journey that hits all the right notes and creates an irresistible treat that’s sophisticated enough for adults but fun enough for kids.
Make-Ahead Convenience
One of my favorite things about these Salted Caramel Pretzel Cheesecake Balls is how wonderfully convenient they are for entertaining. You can prepare them up to three days in advance and keep them chilled until you’re ready to serve. This makes them perfect for holiday gatherings, potlucks, or anytime you need a stress-free dessert option. I often make a double batch on Sunday afternoons, keeping some in the freezer for unexpected guests or late-night cravings. The best part? They actually taste better after the flavors have had time to meld together, making them the ideal prepare-ahead treat for busy hosts.
Essential Tips & Tricks
Perfecting the Texture
Getting the right consistency is key to perfect cheesecake balls. Start with room temperature cream cheese – this is non-negotiable! Cold cream cheese will leave lumps and make mixing much harder. When combining ingredients, don’t overmix or your balls will be too soft to shape. If your mixture seems too sticky, refrigerate it for 30 minutes before rolling. I like to dampen my hands slightly when forming the balls to prevent sticking. For the pretzel coating, crush them to varied sizes – some fine, some chunky – to create interesting texture. This combination of techniques ensures each bite has that perfect cheesecake density with just the right amount of crunch.
Caramel Selection Secrets
Not all caramel is created equal, and choosing the right one makes a huge difference. For these cheesecake balls, I recommend using thick caramel sauce rather than the thin ice cream topping variety. Look for caramel that’s rich and slow-flowing – it should ribbon off the spoon rather than run like water. My personal favorite is homemade caramel, but quality store-bought options like Garlic Butter Chicken Broccoli work beautifully too. For an extra dimension of flavor, try using salted caramel or adding a tiny pinch of flaky sea salt to regular caramel. The slight bitter edge of the salt elevates the sweetness to something truly special.
Serving Ideas & Creative Variations
Elegant Presentation Options
Transform these humble cheesecake balls into showstopping desserts with thoughtful presentation. For formal gatherings, arrange them on a slate board with drizzles of extra caramel and scattered pretzel pieces. Add edible gold dust for a touch of luxury. For a fun twist, serve them skewered on lollipop sticks, creating cheesecake pops that are perfect for dessert tables. I love placing them in mini cupcake liners on a tiered stand for brunches. During the holidays, try arranging them in the shape of a Christmas tree or wreath. The contrast of the creamy balls against a dark serving plate makes the colors pop beautifully and elevates this simple treat into something truly special.
Flavor Variations to Try
While the classic version is divine, don’t be afraid to experiment with flavors. For chocolate lovers, try adding mini chocolate chips to the mixture or dipping the finished balls in melted chocolate before adding the pretzel coating. A coffee variation with espresso powder gives a sophisticated tiramisu-like flavor. For fruit-forward options, mix in freeze-dried strawberry powder or lemon zest. My personal favorite variation includes a tablespoon of bourbon in the mixture and a sprinkle of cinnamon – perfect for fall gatherings! These variations pair wonderfully with Mini Cherry Cheesecakes for a cheesecake-themed dessert spread that will impress any crowd.
Storage & Troubleshooting Guide
Proper Storage Methods
These cheesecake balls need proper refrigeration to maintain their creamy texture and food safety. Store them in an airtight container with parchment paper between layers to prevent sticking. They’ll keep in the refrigerator for up to 5 days, though the pretzel coating may soften slightly over time. For longer storage, freeze them on a baking sheet until solid, then transfer to a freezer container. Frozen cheesecake balls will maintain quality for up to 3 months. When ready to enjoy from frozen, thaw them in the refrigerator for about 2 hours. I don’t recommend leaving them at room temperature for more than 2 hours, as the cream cheese can spoil.
Fixing Common Issues
Even experienced bakers encounter challenges! If your mixture is too soft for rolling, the most likely culprit is warm ingredients or overmixing. Simply chill the mixture for 30-60 minutes until it firms up. If balls are cracking when you roll them, your mixture is probably too cold – let it warm slightly at room temperature. For pretzel coating that won’t stick, try lightly brushing the balls with caramel sauce first as a “glue.” If your finished balls are too sweet, balance them with extra salt in the coating next time. Remember that humidity affects texture too – on particularly humid days, you might need extra refrigeration time before serving.
Frequently Asked Questions
Can I make Salted Caramel Pretzel Cheesecake Balls without a stand mixer?
Absolutely! A hand mixer works perfectly, or you can mix by hand with a wooden spoon if your cream cheese is properly softened. Just be prepared for a bit of arm workout!
How far in advance can I make these for a party?
You can make these up to 3 days ahead and refrigerate them, or freeze them for up to 3 months. The flavors actually improve after a day of chilling.
Can I use low-fat cream cheese?
I don’t recommend it. Full-fat cream cheese provides the rich, creamy texture that makes these special. Low-fat versions tend to be too soft and lack flavor depth.
Are there gluten-free options for the pretzel coating?
Yes! Gluten-free pretzels work perfectly as a substitute. You could also use crushed gluten-free graham crackers or toasted nuts for a different but delicious coating.
Why did my Salted Caramel Pretzel Cheesecake Balls get too soft at room temperature?
Cheesecake balls contain dairy that softens quickly at room temperature. Serve them chilled, and return them to the refrigerator after about 30 minutes for food safety.
Final Thoughts
These Salted Caramel Pretzel Cheesecake Balls represent everything I love about dessert – they’re creamy, crunchy, sweet, salty, and utterly craveable. They prove that sometimes the most impressive treats don’t require hours of complicated work or special equipment. The way they bring together simple ingredients to create something truly special makes them perfect for both everyday indulgences and special celebrations. I hope you’ll give these little treasures a try and experience the joy of watching them disappear before your eyes! For more sweet inspiration, check out my Pinterest boards where I’m always sharing new variations on classic favorites.