

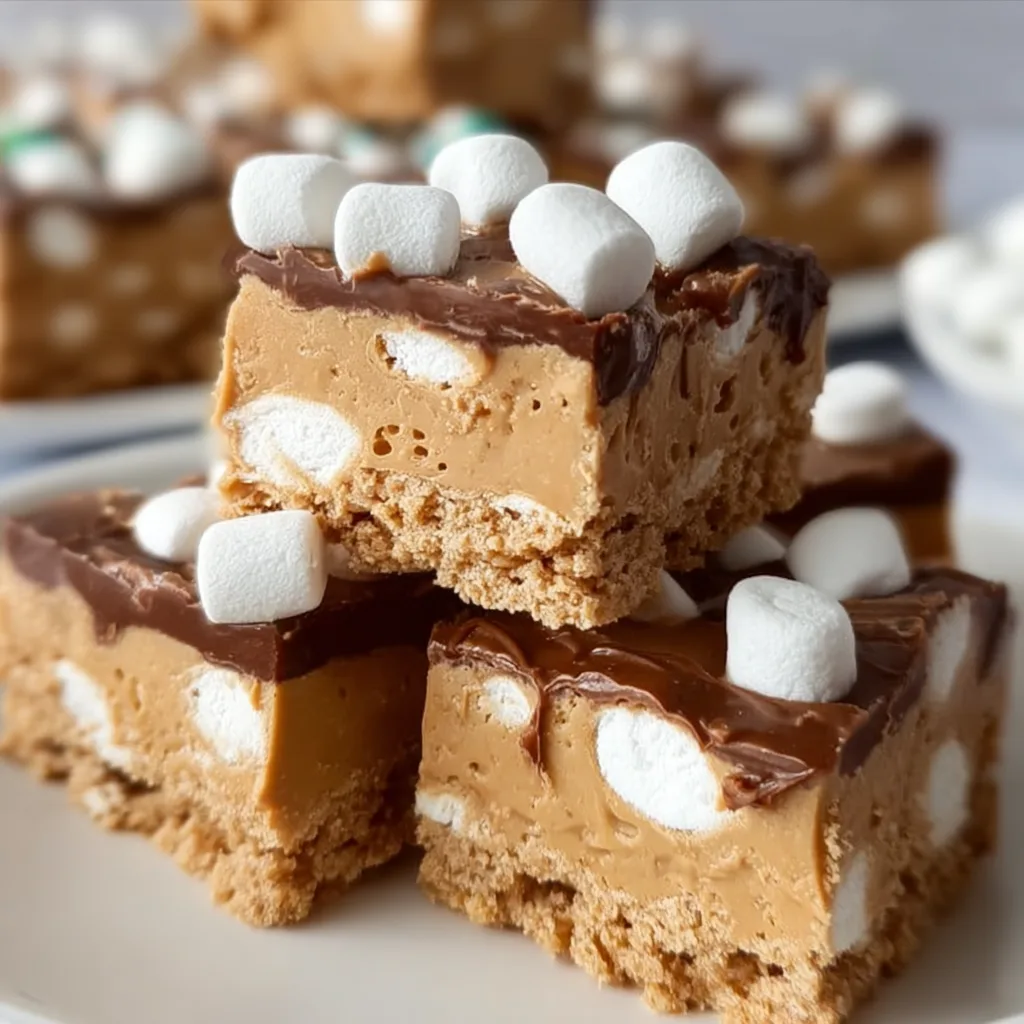
No-Bake Peanut Butter Marshmallow Squares are my absolute go-to when I need something sweet without turning on the oven. These dreamy, creamy squares combine the perfect balance of rich peanut butter, crispy cereal, and gooey marshmallows for an irresistible treat that practically melts in your mouth. I love how the butterscotch chips add that extra layer of sweetness that makes these squares utterly addictive. The best part? You can whip these up in just minutes, making them perfect for last-minute gatherings or when that sweet tooth strikes unexpectedly. They remind me of those childhood treats that would disappear from the cookie jar before mom even noticed! Check out my other no-bake favorites for more quick dessert ideas.
Table of Contents
Recipe
Print
No-Bake Peanut Butter Marshmallow Squares Recipe
- Prep Time: 10 minutes
- Cook Time: 5 minutes
- Total Time: 1 hour 15 minutes
- Yield: 16 squares
- Category: Dessert
- Method: No-Bake
- Cuisine: American
- Diet: Vegetarian
Description
These No-Bake Peanut Butter Marshmallow Squares are a sweet, chewy, and crunchy dessert made with creamy peanut butter, soft marshmallows, and crispy cereal. This quick and easy treat requires no oven, making it perfect for busy days, holidays, or last-minute desserts.
Ingredients
1/2 cup butter
1 cup creamy peanut butter
1 teaspoon vanilla extract
4 cups mini marshmallows
4 cups crispy rice cereal
1 cup powdered sugar
Instructions
1. In a large saucepan over low heat, melt butter and peanut butter together, stirring until smooth.
2. Remove from heat and stir in vanilla extract and powdered sugar until well combined.
3. Add mini marshmallows and gently fold until coated.
4. Stir in crispy rice cereal and mix until evenly combined.
5. Transfer mixture into a greased or parchment-lined baking dish.
6. Press down evenly using a spatula or lightly greased hands.
7. Refrigerate for at least 1 hour until firm.
8. Cut into squares and serve.
Notes
Do not overheat the peanut butter mixture to avoid a dry texture.
Press mixture gently to keep squares soft and chewy.
Store in an airtight container at room temperature for up to 3 days or refrigerate for longer freshness.
You can add chocolate chips for extra flavor.
Why You’ll Love This No-Bake Peanut Butter Marshmallow Squares
Perfect Texture Combination
There’s something magical about the textural contrast in these squares. The crispy rice cereal provides that satisfying crunch, while the melted marshmallows create a chewy, gooey binding that holds everything together perfectly. When you bite into one, you first get that slight resistance before sinking into pure bliss. The peanut butter adds a velvety smoothness that coats your tongue and makes each bite incredibly satisfying. I find myself closing my eyes with each taste, savoring how the textures play together. It’s that perfect balance that makes these squares impossible to eat just one!
Quick and Easy Preparation
As a busy mom, I cherish recipes that deliver maximum flavor with minimum effort, and these squares absolutely deliver! With just 5 minutes of active prep time, you can create a dessert that tastes like you spent hours in the kitchen. No mixer required—just a pot, a spoon, and a pan. I love that I can make these while helping with homework or between Zoom calls. The hardest part is waiting for them to set in the refrigerator, but even that takes only about an hour. These squares have saved countless last-minute playdate snack emergencies and impromptu dinner guests!
Essential Tips & Tricks
Getting the Perfect Consistency
The secret to success with these squares is all in the melting process. Keep your heat medium-low when melting the peanut butter, marshmallows, and butterscotch chips together. Too high, and you’ll end up with a grainy texture; too low, and the ingredients won’t fully incorporate. I gently fold in the cereal rather than stirring vigorously—this preserves those delightful air pockets and keeps everything light. For extra-clean cuts, I briefly dip my knife in hot water and wipe it dry between slices. This creates those picture-perfect edges that make these squares look as good as they taste!
Ingredient Substitutions
Don’t worry if you don’t have every ingredient on hand—these squares are wonderfully adaptable! No butterscotch chips? Chocolate chips work beautifully, creating a more Reese’s-like flavor profile. Crunchy peanut butter can replace creamy for added texture, though I prefer the smooth consistency of creamy. For a twist on the classic, try cinnamon sugar tortilla chips crushed up as a topping! Rice Krispies can be swapped for corn flakes or even crushed graham crackers in a pinch. The marshmallows are non-negotiable for that perfect gooey bind, but mini or regular both work equally well.
Serving Ideas & Creative Variations
Elegant Presentation Options
Transform these humble squares into showstopping desserts with just a few simple touches! For dinner parties, I cut them into perfect 1-inch cubes and arrange them on a slate board with fresh berries and mint sprigs. A light dusting of cocoa powder or powdered sugar adds that professional bakery look. For an extra-special touch, drizzle with melted chocolate or caramel sauce in a zigzag pattern. I’ve even served these as the base for an incredible ice cream sundae bar, topped with vanilla bean ice cream and warm salted caramel pretzel cheesecake balls for the ultimate indulgence.
Seasonal Adaptations
These versatile squares can easily be customized for any holiday or season! For Christmas, I add crushed candy canes and white chocolate drizzle. Halloween calls for orange food coloring in the marshmallow mixture and chocolate spiders on top. Spring celebrations get a pastel makeover with colored white chocolate coating and sprinkles. Summer barbecues? I sandwich a thin layer of vanilla ice cream between two squares for the ultimate frozen treat! The peanut butter base pairs beautifully with so many flavors—try adding dried cranberries and pistachios for a sophisticated holiday version that disappears in minutes.
Storage & Troubleshooting Guide
Keeping Them Fresh
To maintain that perfect chewy-crispy texture, proper storage is key. I store my peanut butter marshmallow squares in an airtight container with parchment paper between layers to prevent sticking. At room temperature, they’ll stay fresh for 3-4 days, though they rarely last that long in my house! For longer storage, the refrigerator works wonderfully for up to a week. The squares might firm up slightly when chilled, so I let them sit at room temperature for about 10 minutes before serving. For make-ahead convenience, these freeze beautifully for up to 3 months—just thaw in the refrigerator overnight.
Fixing Common Issues
Even the simplest recipes can sometimes go awry, but most problems are easily fixable! If your mixture seems too sticky to handle, wet your hands slightly or spray them with non-stick cooking spray before pressing the mixture into the pan. Squares too hard? You likely overcooked the marshmallow mixture—next time, remove from heat as soon as everything is melted. If they’re too soft and falling apart, they need more time to set in the refrigerator. For squares that stuck to the pan despite your best efforts, warm the bottom of the pan briefly with a kitchen towel soaked in hot water to loosen them.
Frequently Asked Questions
Can I make No-Bake Peanut Butter Marshmallow Squares ahead of time?
Absolutely! These squares can be made up to 3 days in advance and stored in an airtight container. They actually develop even better flavor after the first day as the ingredients meld together.
Are these gluten-free?
They can be! Just make sure to use certified gluten-free rice cereal and check your marshmallow and butterscotch chip brands, as some may contain gluten or be processed in facilities with gluten.
Can I use natural peanut butter?
I don’t recommend it. Natural peanut butter separates and doesn’t set properly. Stick with commercial creamy peanut butter for the best texture and consistency.
How do I know when the marshmallows are melted enough?
The marshmallows should be completely smooth with no visible lumps. They’ll transform from puffy white pillows to a glossy, stretchy mixture that pulls away from the sides of the pot.
Why did my No-Bake Peanut Butter Marshmallow Squares turn out too hard?
You likely overheated the mixture. Next time, use medium-low heat and remove from the stove as soon as everything is melted. Remember that they’ll continue to firm up as they cool.
Final Thoughts
These No-Bake Peanut Butter Marshmallow Squares have become my signature potluck contribution for good reason. They strike that perfect balance of nostalgic comfort and impressive presentation that makes everyone ask for the recipe. I love watching people’s faces light up with that first bite—the way their eyes widen at the perfect blend of sweet, salty, creamy, and crispy. Whether you’re a seasoned baker or kitchen-phobic, these squares deliver foolproof deliciousness every time. For more inspiration and variations, check out my Pinterest board where I share all my favorite no-bake treats!