

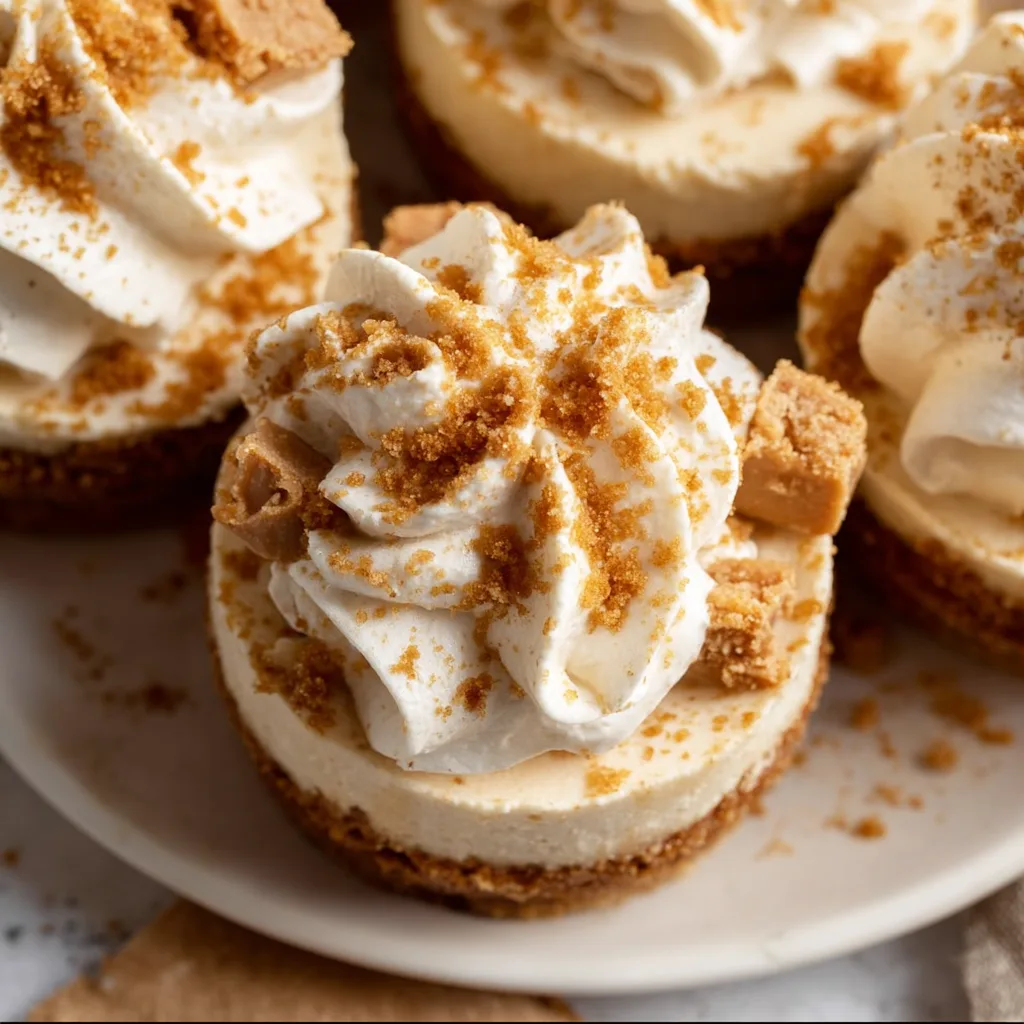
No-Bake Mini Biscoff Cheesecakes with Cookie Butter Whipped Cream are the dreamy little desserts that have been stealing my heart lately. There’s something magical about the spiced caramel notes of Biscoff cookies paired with velvety cream cheese that creates pure dessert perfection. I’ve been making these for weekend gatherings, and they disappear faster than I can say “seconds, please!” The best part? No oven required! These adorable individual treats combine a buttery cookie crust with a silky cheesecake filling and get crowned with the most heavenly cookie butter whipped cream you’ll ever taste.
Table of Contents
Recipe
Print
No-Bake Mini Biscoff Cheesecakes with Cookie Butter Whipped Cream – Easy & Delicious Dessert Recipe
- Prep Time: 20 minutes
- Cook Time: 0 minutes
- Total Time: 2 hours 20 minutes (includes chilling)
- Yield: 6 mini cheesecakes
- Category: Dessert
- Method: No-Bake
- Cuisine: American-European Fusion
- Diet: Vegetarian
Description
These no-bake mini Biscoff cheesecakes are ultra-creamy, packed with cookie butter flavor, and topped with the dreamiest whipped cream made with melted Biscoff spread. A simple dessert that looks fancy, tastes indulgent, and requires zero oven time! Perfect for parties or portioned treats.
Ingredients
For the Crust:
1 1/4 cups Biscoff cookie crumbs (about 15 cookies)
4 tbsp unsalted butter, melted
For the Cheesecake Filling:
8 oz cream cheese, softened
1/2 cup Biscoff cookie butter
1/3 cup powdered sugar
1 tsp vanilla extract
1/2 cup heavy whipping cream
For the Cookie Butter Whipped Cream:
1/2 cup heavy whipping cream
2 tbsp Biscoff cookie butter, melted and slightly cooled
1 tbsp powdered sugar
Optional Garnish:
Crushed Biscoff cookies, cookie halves, or caramel drizzle
Instructions
1. In a bowl, combine Biscoff crumbs and melted butter. Mix until evenly moistened.
2. Press mixture firmly into the bottoms of 6 muffin liners or small jars. Chill while preparing filling.
3. In a medium bowl, beat cream cheese until smooth. Add cookie butter, powdered sugar, and vanilla. Beat until creamy.
4. In a separate bowl, whip heavy cream to stiff peaks. Gently fold into the cheesecake mixture.
5. Spoon or pipe filling over crusts and smooth tops. Chill for at least 2–3 hours.
6.
7. To make the whipped topping, beat cream and powdered sugar until soft peaks form. Add melted cookie butter and whip to stiff peaks.
8. Pipe over chilled cheesecakes. Garnish with cookie crumbles or cookie halves.
9. Serve chilled and store leftovers in the fridge for up to 3 days.
Notes
• Make ahead for parties—flavors deepen overnight!
• Use silicone muffin liners for easy release.
• Swap Biscoff with Nutella or peanut butter for a twist.
Why You’ll Love This No-Bake Mini Biscoff Cheesecakes with Cookie Butter Whipped Cream
Perfect Make-Ahead Dessert Solution
These mini cheesecakes are a busy host’s dream come true. You can prepare them up to two days in advance, which means less stress when company’s coming! The cookie butter flavor actually deepens and intensifies as they chill, making them even more delicious on day two. I love how the texture becomes perfectly set – firm enough to hold its shape but still creamy enough to melt in your mouth. Plus, their individual serving size means no messy cutting or serving issues. Just pull them from the fridge, add a final flourish, and watch your guests’ eyes light up!
Irresistible Flavor Combination
The combination of spiced Biscoff cookies and creamy cheesecake creates a flavor symphony that’s simply irresistible. That distinctive caramelized, slightly spiced cookie flavor infuses every bite, from the crunchy base to the silky filling. The cookie butter whipped cream adds another dimension with its light, airy texture and rich, warm spice notes. What I adore most is how the tanginess of the cream cheese perfectly balances the sweetness of the cookie butter. It’s that perfect sweet-but-not-too-sweet dessert that keeps everyone reaching for “just one more.”
Essential Tips & Tricks
Perfecting the Crust and Filling
The secret to a perfect Biscoff crust is achieving the right texture balance. Pulse cookies until they’re fine crumbs but stop before they turn to dust – you want that slight texture! When mixing with melted butter, it should feel like damp sand that holds together when pressed. For the filling, room temperature cream cheese is absolutely essential – cold cream cheese will leave lumps no matter how long you mix. I’ve found that a quick 10-second whip of the heavy cream before adding other ingredients creates the perfect silky texture that sets beautifully without being too dense or too airy.
Achieving Professional-Looking Results
For picture-perfect mini cheesecakes, invest in a piping bag with a large star tip – it transforms the presentation from homemade to professional with minimal effort. If you don’t have one, a zip-top bag with the corner snipped works in a pinch! When filling your serving glasses or jars, tap them gently on the counter to remove air bubbles and create a smooth surface. For the most beautiful layers, chill each layer before adding the next. My favorite trick? Freeze them for 15 minutes before adding the final whipped topping – this prevents any mixing between layers and gives you those crisp, defined sections.
Serving Ideas & Creative Variations
Elegant Presentation Options
Transform these mini cheesecakes into showstopping desserts with a few simple presentation tweaks. Serve them in clear glass containers – small mason jars, shot glasses, or vintage teacups all work beautifully and showcase those gorgeous layers. For special occasions, dust the tops with ground cinnamon or cocoa powder using a small paper stencil for an elegant design. I love adding a tiny Biscoff cookie perched at an angle as a garnish! For dinner parties, place each serving on a small plate with a fresh berry garnish and a mint leaf for a pop of color that makes the dessert look like it came from a five-star restaurant.
Exciting Flavor Variations
While the classic version is divine, these mini cheesecakes are wonderfully adaptable. Try adding a chocolate dimension by incorporating 2 tablespoons of cocoa powder into the filling or layering with a thin chocolate ganache. For a fruity twist, add a layer of raspberry compote between the crust and filling – the tartness perfectly complements the sweet spice of the Biscoff. During fall, I love adding a teaspoon of pumpkin spice to the filling and a tablespoon of pumpkin puree for a seasonal treat. My personal favorite variation? Adding a thin layer of salted caramel sauce between the cheesecake and whipped cream layers for an extra decadent dessert experience.
Storage & Troubleshooting Guide
Proper Storage Techniques
These cheesecakes maintain their best quality when properly stored. Keep them in the refrigerator covered with plastic wrap for up to 5 days – though they rarely last that long in my house! If you need to make them further in advance, they freeze beautifully for up to a month. Just wrap each one individually in plastic wrap, then place in a freezer-safe container. Thaw overnight in the refrigerator before serving. One important note: add any fresh fruit garnishes just before serving, as they can release moisture during storage. For the freshest taste, I recommend adding the cookie butter whipped cream topping within 24 hours of serving.
Fixing Common Issues
If your cheesecake filling seems too runny, it’s likely due to over-mixing which incorporates too much air. The fix? Chill immediately for at least 4 hours, and it will usually set properly. If your crust crumbles when serving, it probably needs more butter – add an extra tablespoon next time. For whipped cream that separates or becomes watery, make sure your heavy cream is very cold before whipping, and consider adding a stabilizer like 1 teaspoon of unflavored gelatin bloomed in 1 tablespoon of cold water. If cookie butter makes your whipped cream too heavy, try folding it in after whipping rather than beating it in.
Frequently Asked Questions
Can I make these No-Bake Mini Biscoff Cheesecakes with Cookie Butter Whipped Cream vegan?
Yes! Substitute vegan cream cheese, coconut cream instead of heavy cream, and use coconut oil in place of butter. Many Biscoff cookies are accidentally vegan, but double-check your specific brand’s ingredients.
How far in advance can I make these cheesecakes?
You can make the base and filling up to 3 days ahead. Add the cookie butter whipped cream no more than 24 hours before serving for the best texture and flavor.
What can I substitute for cookie butter if I can’t find it?
Nutella works beautifully, as does peanut butter mixed with a bit of cinnamon and brown sugar. Dulce de leche with a pinch of cinnamon also creates a similar flavor profile.
Why did my filling not set properly?
Under-whipping the cream or using cream cheese straight from the refrigerator can prevent proper setting. Make sure ingredients are at the right temperature and give it at least 4 hours to set.
Can I make this as one large cheesecake instead of minis?
Absolutely! Use a 9-inch springform pan with the same ingredients. Increase chilling time to at least 6 hours or overnight for proper setting.
Final Thoughts
These No-Bake Mini Biscoff Cheesecakes with Cookie Butter Whipped Cream have become my secret weapon for effortless entertaining. Their make-ahead convenience, stunning presentation, and that irresistible cookie butter flavor create a dessert experience that feels special without hours in the kitchen. I love watching friends take that first bite and seeing their eyes close in pure dessert bliss. The contrast between the crunchy crust, silky cheesecake, and cloud-like whipped cream creates textural magic that elevates this simple dessert to something truly memorable. Find more of my favorite recipes on Pinterest!