


The aroma of Garlic Herb Dutch Oven Bread baking in your kitchen is nothing short of magical. That crispy, crackling crust giving way to a pillowy-soft interior studded with fragrant herbs and roasted garlic cloves is what bread dreams are made of. I’ve been perfecting this recipe for years, and trust me, it’s the kind of bread that makes you feel like a professional baker, even if you’ve never worked with yeast before. The beauty lies in its simplicity—just a few quality ingredients transformed into something extraordinary through the gentle heat of a Dutch oven.
Table of Contents
Recipe
Print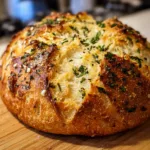
Garlic Herb Dutch Oven Bread Recipe
- Prep Time: 15 minutes
- Cook Time: 45 minutes
- Total Time: 3 hours
- Yield: 1 loaf
- Category: Bread
- Method: Baking
- Cuisine: American
- Diet: Vegetarian
Description
Garlic Herb Dutch Oven Bread is rustic, golden, and packed with homemade artisan flavor. This easy no-knead bread features a crisp crust, soft chewy center, fragrant garlic, and savory herbs for the perfect bakery-style loaf made right at home.
Ingredients
3 cups all-purpose flour
1 1/2 teaspoons salt
1 teaspoon sugar
2 teaspoons instant yeast
4 cloves garlic, minced
1 tablespoon chopped fresh rosemary
1 tablespoon chopped fresh parsley
1 teaspoon dried thyme
1 1/4 cups warm water
1 tablespoon olive oil
Extra flour for shaping
Instructions
1. In a large bowl, whisk together flour, salt, sugar, and instant yeast.
2. Stir in minced garlic, rosemary, parsley, and thyme.
3. Pour warm water and olive oil into the flour mixture.
4. Mix until a shaggy dough forms.
5. Cover the bowl with plastic wrap or a towel and let the dough rise for 2 to 3 hours until doubled in size.
6. Place a Dutch oven with the lid into the oven and preheat to 450°F.
7. Turn dough onto a lightly floured surface and shape into a round loaf.
8. Carefully transfer the dough onto parchment paper.
9. Remove the hot Dutch oven from the oven and place the dough inside.
10. Cover with the lid and bake for 30 minutes.
11. Remove the lid and bake for another 10 to 15 minutes until deeply golden brown.
12. Cool bread on a wire rack before slicing and serving.
Notes
Use fresh herbs for the best flavor and aroma.
Do not skip preheating the Dutch oven because it creates the crispy artisan crust.
Bread flour creates a slightly chewier texture if preferred.
Store bread wrapped at room temperature for up to 3 days.
Why You’ll Love This Garlic Herb Dutch Oven Bread
Perfect for Beginners
This bread is wonderfully forgiving for first-time bakers. Unlike fussy artisan recipes that require precise techniques, this dough embraces imperfection. The long, slow rise develops flavor while the Dutch oven creates the perfect environment for baking. I remember my first attempt—I was certain I’d messed up when my dough looked shaggy, but it transformed into a gorgeous loaf with a crackling crust. The minimal handling means less chance of overworking the dough, making this practically foolproof even if you’ve never baked bread before.
Incredible Flavor Depth
The combination of fresh herbs and roasted garlic creates a flavor profile that’s both complex and comforting. As the bread bakes, the herbs release their essential oils, infusing every bite with aromatic goodness. I like using a mixture of rosemary, thyme, and oregano, but you can customize based on what you have on hand. The garlic transforms from sharp and pungent to sweet and mellow during baking. This bread doesn’t just taste good—it fills your home with an irresistible scent that will have everyone gravitating toward the kitchen.
Essential Tips & Tricks
Mastering the Dutch Oven Method
The preheated Dutch oven is your secret weapon for achieving that professional-quality crust. Heat your Dutch oven (with the lid on) in a 450°F oven for at least 30 minutes before baking. This creates a mini steam oven when you add the dough and cover it. The initial covered bake traps moisture from the dough, creating steam that helps develop that gorgeous crackling crust. For the final 15 minutes, remove the lid to allow the bread to brown beautifully. Always use oven mitts and caution when handling the extremely hot Dutch oven!
Perfecting Your Dough Consistency
Achieving the right hydration is crucial for a light, airy crumb. Your dough should be slightly sticky but manageable—not so wet that it’s impossible to shape, but not so dry that it feels dense. When mixing, add water gradually until you reach this consistency. Remember that different flours absorb moisture differently. If your dough seems too wet after mixing, don’t panic! Instead of adding more flour, use a light dusting on your work surface and hands when shaping. Let time do the work—as the dough rises, the flour will continue absorbing moisture.
Serving Ideas & Creative Variations
Perfect Pairings
This bread shines as the centerpiece of any meal. Serve thick, warm slices alongside a hearty soup like Slow Cooker Chicken Stew for the ultimate comfort food experience. For a simple yet elegant appetizer, brush slices with olive oil, toast lightly, and serve with a creamy burrata or ricotta topped with honey and cracked pepper. On lazy weekend mornings, nothing beats a thick slice toasted and spread with salted butter and homemade jam. The robust garlic and herb flavors also make it perfect for sopping up pasta sauce or the juices from a roasted chicken.
Exciting Flavor Twists
Don’t be afraid to experiment with this versatile recipe! Add a Mediterranean twist with sun-dried tomatoes, olives, and feta folded into the dough. For a cheesy version, incorporate shredded Gruyère or Parmesan—the cheese creates delicious crispy bits on the crust. Feeling adventurous? Try a sweet-savory variation with caramelized onions and a touch of honey. For a spicy kick, add red pepper flakes or finely chopped jalapeños. You can even swap the herbs completely—try a combination of dill and lemon zest for a bright, spring-inspired loaf.
Storage & Troubleshooting Guide
Keeping Your Bread Fresh
To maintain that perfect texture, store your bread cut-side down on a cutting board for the first day. For longer storage, wrap in a clean kitchen towel and place in a paper bag—this preserves the crust better than plastic. If you won’t finish it within 2-3 days, slice the entire loaf and freeze it in a ziplock bag. Frozen slices can go straight into the toaster for nearly fresh-baked taste. Avoid refrigerating your bread, as this actually accelerates staling. If your bread does get a bit stale, transform it into amazing croutons, bread pudding, or French toast.
Solving Common Issues
If your bread didn’t rise properly, temperature is likely the culprit. Yeast thrives between 75-85°F—too cold and it becomes sluggish, too hot and it dies. Check your yeast’s expiration date and try the float test before baking: place a small piece of dough in water; if it floats, it’s properly risen. For a denser-than-desired crumb, you might need more water or a longer rise time. If your crust isn’t crispy enough, try increasing your oven temperature by 25°F or extending the lid-off baking time. Remember that every oven is different, so don’t be afraid to adjust timing based on your results.
Frequently Asked Questions
Can I make Garlic Herb Dutch Oven Bread without a Dutch oven?
Yes! A heavy oven-safe pot with lid works well. Alternatively, use a baking stone or sheet with a heat-safe bowl inverted over your dough for the first 30 minutes to create steam.
How do I know when my bread is fully baked?
The bread should be deeply golden and sound hollow when tapped on the bottom. For certainty, use an instant-read thermometer—the internal temperature should reach 205-210°F.
Can I prepare the dough ahead of time?
Absolutely! Refrigerate the dough after the first rise for up to 3 days. This slow fermentation actually improves flavor. Bring to room temperature before shaping and final rise.
What’s the best flour for this recipe?
Bread flour creates the chewiest texture, but all-purpose works well too. For extra flavor, substitute up to 25% with whole wheat, rye, or spelt flour.
Why did my Garlic Herb Dutch Oven Bread collapse when I scored it?
Your dough was likely over-proofed. Next time, do the finger-poke test—if an indentation springs back halfway, it’s ready to bake. If it doesn’t spring back, it’s over-proofed.
Final Thoughts
This Garlic Herb Dutch Oven Bread has become my signature recipe for a reason—it delivers professional-quality results with minimal effort. The combination of that crackling crust, tender interior, and aromatic herbs creates something truly special that will elevate any meal. Don’t be surprised when friends and family start requesting “your famous bread” at every gathering! For more inspiration and variations on this recipe, check out my Pinterest board where I share all my favorite bread-baking discoveries.