

When elegant French patisserie meets creamy New York cheesecake, magic happens in the form of these Vanilla Bean Crème Brûlée Cheesecake Cupcakes. As someone who’s always searching for that perfect special occasion dessert that still feels approachable, I fell head over heels for these individual-sized delights that combine the best of both worlds. The moment you crack through that glassy caramelized sugar top into the silky-smooth vanilla bean-speckled cheesecake beneath, you know you’ve discovered something extraordinary.
These Vanilla Bean Crème Brûlée Cheesecake Cupcakes have become my go-to recipe when I want to impress guests without spending hours in the kitchen – they deliver all the wow factor of a fancy restaurant dessert but can be made right in your own kitchen. The marriage of rich cheesecake with the characteristic burnt sugar crust of crème brûlée creates an irresistible contrast of textures that makes each bite pure bliss. As the winter evenings draw in, there’s something incredibly cozy about torching these little beauties to perfection and watching that sugar transform into a golden mirror-like finish. Let me show you exactly how to create these show-stopping treats that combine two beloved desserts into one unforgettable experience.

Table of Contents
Recipe
Print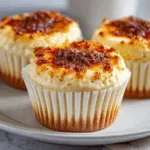
Vanilla Bean Crème Brûlée Cheesecake Cupcakes – Dreamy & Decadent
- Prep Time: 20 minutes
- Cook Time: 20 minutes
- Total Time: 3 hours (includes chilling)
- Yield: 12 cupcakes
- Category: Dessert
- Method: Bake + Torch
- Cuisine: French-American Fusion
- Diet: Vegetarian
Description
These Vanilla Bean Crème Brûlée Cheesecake Cupcakes combine everything you love about silky cheesecake and crisp-topped crème brûlée. They’re baked in cupcake liners—no water bath needed—and finished with a caramelized sugar crackle that makes them feel oh-so fancy.
Ingredients
**Crust:**
3/4 cup graham cracker crumbs
2 tablespoons granulated sugar
3 tablespoons unsalted butter, melted
**Cheesecake Filling:**
16 oz cream cheese, softened
1/2 cup granulated sugar
1/2 teaspoon vanilla bean paste (or 1/2 scraped vanilla bean)
1/2 teaspoon vanilla extract
2 large eggs
1/4 cup sour cream
**Topping:**
2–3 tablespoons granulated sugar (for brûlée)
Instructions
1. Preheat oven to 325°F (163°C). Line a muffin pan with 12 paper liners.
2. In a bowl, mix graham crumbs, sugar, and melted butter. Press about 1 tablespoon into each liner.
3. Bake crusts for 5 minutes. Let cool while you prepare the filling.
4. In a mixing bowl, beat cream cheese until smooth. Add sugar, vanilla bean paste, and extract.
5. Add eggs one at a time, mixing gently after each. Mix in sour cream until smooth.
6. Divide filling evenly over crusts. Tap pan gently to release air bubbles.
7. Bake 18–20 minutes, until centers are just set. Let cool completely, then chill at least 3 hours.
8. Just before serving, sprinkle 1/2 tsp sugar over each cupcake and torch until golden and crisp.
Notes
For best texture, don’t overbake—cheesecakes should still jiggle slightly when done.
Use a kitchen torch for the topping. A broiler can work, but watch closely!
Store in the fridge (without brûlée top) for up to 3 days. Torch just before serving.
What Makes These Vanilla Bean Crème Brûlée Cheesecake Cupcakes So Irresistible
These Vanilla Bean Crème Brûlée Cheesecake Cupcakes are the perfect fusion of two classic desserts, creating an experience that’s greater than the sum of its parts. Just like our beloved Cookie Butter Cheesecake Cups, these treats strike the perfect balance between impressive and achievable.
What sets these cupcakes apart is their incredible texture contrast – that magical moment when your spoon breaks through the glassy caramelized top into the creamy cheesecake beneath is pure dessert poetry. The vanilla bean-speckled filling offers an authentic, rich flavor that artificial extracts simply can’t match. Each bite delivers a perfect harmony of smooth and crisp, warm and cool, sweet and slightly bitter from the caramelized sugar.
The individual serving size makes these perfect for entertaining – no messy slicing or serving required. Plus, they can be made ahead and torched just before serving, making them ideal for dinner parties or special occasions. The dramatic tableside torching adds an element of theater that never fails to impress guests.
The recipe is surprisingly forgiving for such an elegant dessert. The cheesecake base is stable enough to hold up to the torching process without melting, while still maintaining that luxurious, silky texture we all love. And unlike traditional crème brûlée, there’s no water bath to worry about – these bake perfectly in a standard muffin tin.
The versatility of these cupcakes is another reason to love them. They can be dressed up with seasonal fruit, edible flowers, or gold leaf for special occasions, or served simply with their glossy caramel tops for everyday indulgence. The base recipe also welcomes variations – think chocolate, coffee, or even seasonal pumpkin spice versions.
Chef Tips for Perfect Vanilla Bean Crème Brûlée Cheesecake Cupcakes Every Time
After countless batches testing these Vanilla Bean Crème Brûlée Cheesecake Cupcakes (and happy taste-testers later), I’ve discovered some game-changing tips that’ll help you achieve perfect results every time. Just like mastering our No-Bake Champagne Cheesecake Cups, success lies in the details.
First, let’s talk about temperature – it’s absolutely crucial that all your ingredients are at room temperature before you begin. Cold cream cheese will lead to lumpy batter, no matter how long you beat it. I recommend taking your ingredients out of the fridge at least two hours before starting.
When it comes to the vanilla beans, don’t skimp – this is where the magic happens. Split the pod lengthwise and scrape out every last bit of those tiny seeds. The pods themselves can be saved to make vanilla sugar or extract. If you absolutely must substitute, use vanilla bean paste rather than extract for those beautiful specks and intense flavor.
The baking process requires attention to detail. A lower temperature (around 325°F) and a slightly longer bake time helps prevent cracks and ensures that silky-smooth texture. You’ll know they’re done when the edges are set but the centers still have a slight wobble – they’ll continue to set as they cool.
For the perfect brûlée top, patience is key. The cheesecakes must be thoroughly chilled before torching – overnight is ideal, but at least 4 hours is necessary. Use regular granulated sugar for the top, spreading it in a thin, even layer. Any clumps will result in uneven caramelization.
When torching, hold the flame about 2-3 inches from the surface and move it constantly in small circles. Watch carefully – the transformation from sugar to caramel happens quickly, and there’s a fine line between perfectly caramelized and burnt.
One common mistake to avoid: don’t try to brûlée the tops too far in advance. The caramelized sugar will slowly soften from the moisture in the cheesecake, losing that satisfying crack. Torch them no more than 2 hours before serving for optimal texture.
How to Serve Vanilla Bean Crème Brûlée Cheesecake Cupcakes for Maximum Enjoyment
The art of serving these Vanilla Bean Crème Brûlée Cheesecake Cupcakes is almost as enjoyable as making them. I love creating special moments around dessert, and just like our Mini Cannoli Cups, these little treasures have a way of making any occasion feel extra special.
Timing is everything when serving these cupcakes. The ideal moment to enjoy them is about 5-10 minutes after torching the tops. This allows the caramelized sugar to set completely while ensuring the cheesecake beneath is at the perfect temperature. The contrast between the cool, creamy center and the warm, crispy top is absolutely divine.
For casual gatherings, serve them straight from their cupcake liners on small dessert plates. For more formal occasions, carefully remove the liners and plate them with style. I love to create a simple but elegant presentation by adding a small dollop of lightly whipped cream and a few fresh seasonal berries. In summer, try fresh raspberries or blackberries; in winter, a few pomegranate seeds add beautiful color and texture.
Consider creating a dessert station where you torch the tops to order – it’s interactive and adds a wonderful element of theater to your gathering. The golden glow of the torch and the sizzling sound of sugar caramelizing never fails to draw guests in.
For seasonal variations, try these creative twists:
– Spring: Add a touch of lavender to the sugar topping and garnish with edible flowers
– Summer: Infuse the cheesecake with lemon zest and serve with fresh berries
– Fall: Incorporate maple sugar into the brûlée topping and garnish with candied pecans
– Winter: Add a hint of orange zest to the base and serve with sugared cranberries
For photography-worthy presentation, try these styling tips:
– Use a mix of gold and white serving pieces for elegant contrast
– Capture the moment just after torching when the sugar is still bubbling
– Photograph from an angle to show both the glossy top and creamy interior
– Include props like vintage spoons or scattered vanilla beans
Don’t forget about beverage pairings. These cupcakes are beautiful alongside:
– A shot of espresso
– Late harvest dessert wine
– Champagne or prosecco
– Earl Grey tea
– Aged bourbon
For large gatherings, consider setting up a ‘dessert flight’ with mini versions of these cupcakes alongside other complementary treats. The key is to balance flavors and textures – perhaps something chocolate, something fruit-based, and these creamy, vanilla-forward beauties as the star.

How to Store and Reheat Vanilla Bean Crème Brûlée Cheesecake Cupcakes
Proper storage is crucial for maintaining the perfect texture of your Vanilla Bean Crème Brûlée Cheesecake Cupcakes. As noted by Serious Eats’ guide to dessert storage, cheesecake requires careful attention to temperature and humidity control.
For the uncaramelized cheesecake cupcakes:
– Refrigerator storage: Place in an airtight container and store for up to 5 days. Keep them away from strong-smelling foods as cheesecake can absorb odors easily.
– Freezer storage: Wrap individual cupcakes in plastic wrap, then aluminum foil, and freeze for up to 3 months. Thaw overnight in the refrigerator before torching.
For cupcakes with caramelized tops:
– Best enjoyed within 2 hours of torching for optimal texture
– Can be refrigerated for up to 24 hours, but the caramel will soften
– Not recommended for freezing after caramelization
Troubleshooting Common Issues:
1. Cracked Tops:
– Usually caused by rapid temperature changes
– Solution: Cool gradually by turning off oven and leaving door slightly ajar
– Prevention: Avoid overbaking and ensure all ingredients are room temperature
2. Soggy Caramel:
– Caused by moisture from the cheesecake or environment
– Solution: Torch just before serving
– Prevention: Ensure cupcakes are well-chilled before torching
3. Uneven Caramelization:
– Usually due to sugar application or torching technique
– Solution: Use finely ground sugar and move torch constantly
– Prevention: Practice on a test cupcake first
4. Burnt Sugar:
– Happens when sugar is too thick or torch is too close
– Solution: Scrape off and try again with less sugar
– Prevention: Use thin, even layer of sugar and keep torch moving
Reheating Tips:
– Never microwave after caramelization
– If frozen, thaw completely in refrigerator (8-12 hours)
– Bring to room temperature for 15-20 minutes before serving
– Re-torch if caramel has softened, using a very light touch
FAQs
Can I make these Vanilla Bean Crème Brûlée Cheesecake Cupcakes without a kitchen torch?
While a kitchen torch provides the best control and results, you can use your oven’s broiler as an alternative. Place the cupcakes on the top rack, sprinkle with sugar, and broil for 2-3 minutes, watching very carefully to prevent burning. Note that the results may be less even than with a torch.
Can I make these ahead for a party?
Yes! Make the cheesecake cupcakes up to 3 days in advance and store them in the refrigerator. Wait to caramelize the tops until 1-2 hours before serving for the best texture contrast.
What can I substitute for vanilla beans?
While vanilla beans provide the best flavor and those beautiful specks, you can substitute 1 tablespoon of vanilla bean paste or 2 teaspoons of pure vanilla extract. Avoid imitation vanilla as it won’t provide the same rich flavor.
Can I make a lighter version of these cupcakes?
Yes, you can make a lighter version by using reduced-fat cream cheese and Greek yogurt in place of some of the heavy cream. The texture will be slightly different but still delicious. Keep in mind that the caramelized sugar top is essential to the recipe’s character and can’t be substituted.
Conclusion
Creating these Vanilla Bean Crème Brûlée Cheesecake Cupcakes is more than just baking – it’s about crafting moments of pure joy and celebration. Whether you’re serving them at a dinner party or treating yourself to a special dessert, these cupcakes have a way of making any occasion feel extraordinary. The combination of smooth, creamy cheesecake and that perfectly crisp caramelized top creates a dessert experience that’s truly unforgettable. Remember to take your time with each step, especially the final torching – it’s that moment of transformation that makes these treats so special. We’d love to see your creations! Share your photos and tag @treatiful so we can celebrate your success. Follow us on Pinterest for more cozy dessert ideas.