

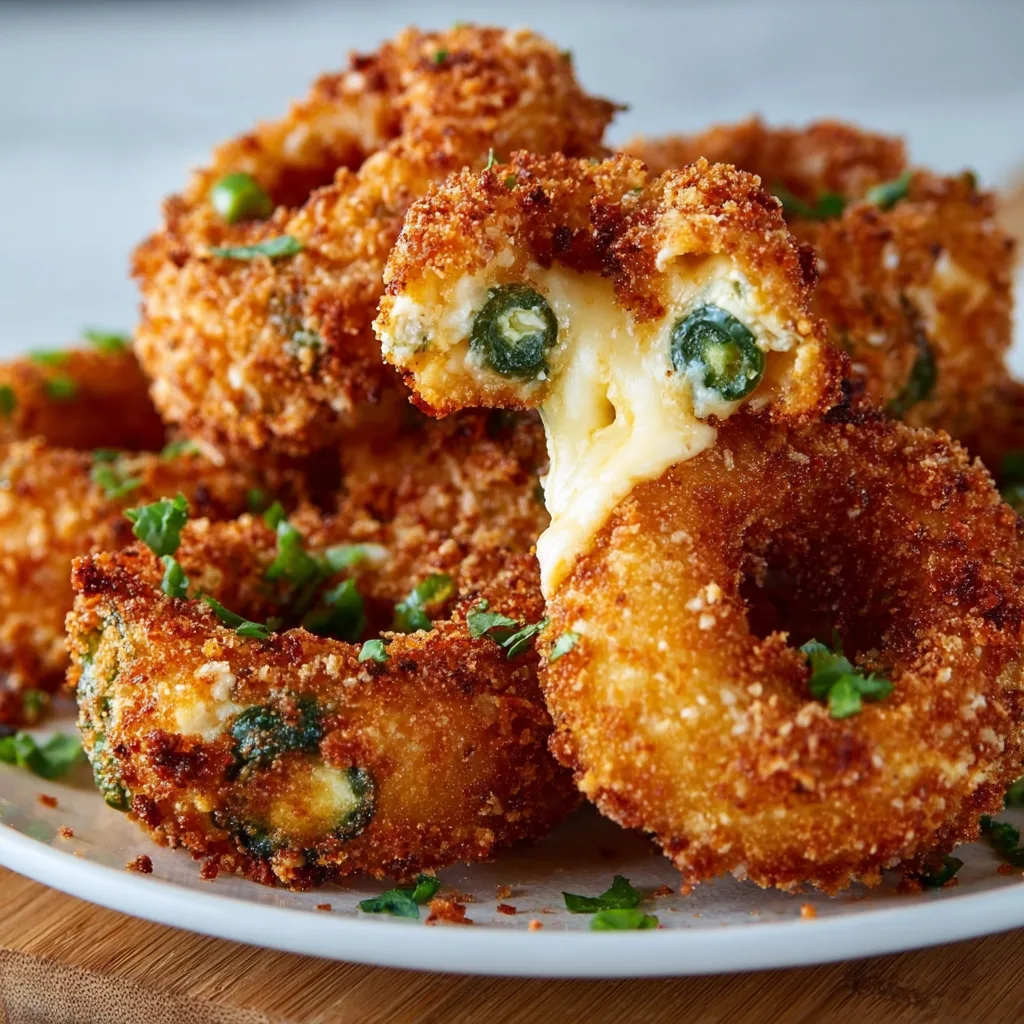
Jalapeño Popper Stuffed Onion Rings combine two of my absolute favorite appetizers into one mind-blowing snack that’ll have your taste buds doing a happy dance! Imagine biting through a crispy, golden-brown onion ring only to discover a creamy, spicy jalapeño popper filling hiding inside. It’s the ultimate party food mashup that disappears faster than you can say “seconds, please!” I’ve been perfecting this recipe for years, and trust me, once you try these crispy flavor bombs, you’ll wonder how you ever lived without them. Let’s dive into this irresistible treat that’s guaranteed to be the star of your next gathering!
Table of Contents
Recipe
Print
Crispy Jalapeño Popper Stuffed Onion Rings
- Prep Time: 25 minutes
- Cook Time: 15 minutes
- Total Time: 40 minutes
- Yield: 12 stuffed onion rings
- Category: Snack
- Method: Frying
- Cuisine: American
- Diet: Vegetarian
Description
Crispy Jalapeño Popper Stuffed Onion Rings are spicy, cheesy, and irresistibly crunchy. Thick onion rings get stuffed with creamy cheese, jalapeños, and crispy coating, then fried until golden brown for the ultimate party snack or game day appetizer.
Ingredients
2 large sweet onions
4 ounces cream cheese, softened
1 cup shredded cheddar cheese
2 jalapeños, finely diced
1/2 teaspoon garlic powder
1/2 teaspoon onion powder
1/2 teaspoon salt
1/4 teaspoon black pepper
1 cup all-purpose flour
2 large eggs, beaten
1 1/2 cups panko breadcrumbs
Oil for frying
Chopped parsley for garnish
Ranch dressing for serving
Instructions
1. Slice onions into thick rings and separate the layers carefully.
2. Pair larger onion rings with slightly smaller rings to create spaces for stuffing.
3. In a bowl, mix cream cheese, cheddar cheese, diced jalapeños, garlic powder, onion powder, salt, and black pepper until creamy.
4. Fill the gap between paired onion rings with the cheese mixture and press gently to secure.
5. Place stuffed onion rings onto a tray and freeze for 20 minutes.
6. Prepare three bowls with flour, beaten eggs, and panko breadcrumbs.
7. Coat each stuffed onion ring in flour, dip into eggs, and cover with breadcrumbs.
8. Heat oil in a deep skillet or pot over medium heat.
9. Fry onion rings in batches for 2 to 3 minutes until golden brown and crispy.
10. Transfer to a paper towel-lined plate to drain excess oil.
11. Garnish with parsley and serve warm with ranch dressing.
Notes
Freeze the stuffed onion rings before breading to help them hold their shape.
Use gloves while handling jalapeños to avoid irritation.
Pepper Jack cheese adds extra spicy flavor.
Bake at 425°F for 20 minutes if you prefer a lighter version.
Why You’ll Love This Jalapeño Popper Stuffed Onion Rings
Perfect Texture Combination
The contrasting textures in these stuffed onion rings are what make them truly special. The exterior delivers that satisfying crunch you expect from a perfect onion ring, while the interior reveals a creamy, melty filling that oozes with each bite. I love how the sweet onion softens during cooking, creating a tender layer between the crispy coating and the rich filling. The panko breadcrumb exterior gets incredibly golden and crunchy, providing that unmistakable satisfying crackle when you bite in. It’s a textural symphony that makes these impossible to resist!
Flavor Explosion in Every Bite
These rings deliver a flavor powerhouse that hits all the right notes. The sweet caramelized onion perfectly balances the spicy kick from the jalapeños, while the tangy cream cheese filling cools things down just enough. I’ve added bacon bits for that smoky depth and sharp cheddar for extra richness. The seasoned breadcrumb coating brings everything together with hints of garlic and paprika that complement without overwhelming. It’s that perfect balance of heat, creaminess, saltiness, and sweetness that makes your taste buds sing. One bite and you’ll be hooked!
Essential Tips & Tricks
Mastering the Assembly Process
The assembly technique is crucial for perfect stuffed rings. Slice your onions at least ½-inch thick to ensure they can hold the filling without breaking. After separating the rings, I recommend chilling them for 30 minutes to help them hold their shape. When piping in the filling, leave a small gap around the edges to prevent leaking during cooking. Gently press the filling into place before dredging. For the coating, use one hand for wet ingredients and one for dry to avoid the dreaded “club hand” of sticky batter buildup. Patience during this step pays off beautifully!
Temperature Control is Key
Getting the oil temperature just right makes all the difference between soggy disappointments and crispy perfection. I always use a thermometer to maintain 350°F-365°F throughout cooking. If the oil is too cool, the rings absorb excess grease; too hot, and the exterior burns before the filling warms through. Work in small batches (3-4 rings maximum) to prevent temperature drops. After frying, let the rings rest on a wire rack rather than paper towels—this prevents steam from softening that beautiful crisp exterior. This attention to temperature detail creates that flawless golden crust we’re all after!
Serving Ideas & Creative Variations
Perfect Dipping Companions
The right dipping sauce elevates these stuffed rings to legendary status. My go-to is a simple ranch dressing spiked with lime juice and cilantro, which complements the spicy filling beautifully. For something different, try a honey-sriracha mayo that balances sweet and heat, or a cooling avocado crema that soothes the jalapeño kick. For presentation, I serve these rings standing upright in a shallow bowl of sauce, allowing guests to grab and dip as desired. The visual impact is stunning and practical! These make fantastic companions to crispy chicken sandwiches for a complete meal.
Exciting Flavor Twists
Don’t be afraid to put your own creative spin on the basic recipe! My buffalo chicken variation replaces jalapeños with buffalo sauce and blue cheese for a game-day favorite. For a Mediterranean twist, try a spinach-feta filling with sun-dried tomatoes and oregano. Seafood lovers adore my crab rangoon version with cream cheese, crab meat, and green onions. You can even go sweet with a churro-inspired dessert ring filled with cinnamon-cream cheese and rolled in cinnamon sugar after frying. The possibilities are endless, and experimenting is half the fun!
Storage & Troubleshooting Guide
Keeping Them Crispy
Maintaining that perfect crunch can be challenging with leftovers, but I’ve discovered some tricks. For best results, store completely cooled rings in a paper towel-lined airtight container in the refrigerator for up to 2 days. When reheating, avoid the microwave which creates steam and soggy rings. Instead, place them on a wire rack in a 375°F oven for 7-10 minutes until heated through. For make-ahead options, you can prepare and stuff the rings, then freeze them uncoated on a parchment-lined tray until solid. Transfer to freezer bags for up to 1 month, then thaw, coat, and fry when needed.
Fixing Common Problems
Even experienced cooks encounter occasional issues with these complex treats. If your filling leaks during frying, your oil temperature might be too low—increase it slightly and ensure rings are properly sealed. For rings that won’t stay together, try chilling the assembled rings for 20 minutes before coating. If your coating isn’t adhering well, make sure your flour layer is complete and pat off excess egg wash before adding breadcrumbs. For rings that are browning too quickly, reduce heat slightly and finish them in a 350°F oven. With practice, you’ll develop an intuitive feel for the perfect timing and temperature!
Frequently Asked Questions
Can I bake Jalapeño Popper Stuffed Onion Rings instead of frying?
Yes! Preheat your oven to 425°F, spray the coated rings with cooking oil, and bake for 15-18 minutes, turning halfway. They won’t be quite as crispy as fried, but still delicious and healthier.
How spicy are these rings?
The heat level is moderate but customizable. Remove all seeds and membranes for milder rings, or leave some in for extra kick. You can also substitute poblanos for jalapeños for a milder flavor profile.
Can I make these ahead for a party?
You can prepare the components up to a day ahead—make the filling and slice onions, storing separately. Assemble and fry just before serving for best results, or fry up to 2 hours ahead and reheat in the oven.
What’s the best cheese to use in the filling?
Sharp cheddar provides the best flavor, but monterey jack melts beautifully. For extra indulgence, try a mixture of cream cheese, cheddar, and pepper jack for complex flavor and perfect meltability.
Why did my Jalapeño Popper Stuffed Onion Rings fall apart during frying?
This usually happens when rings are too thin, filling is overstuffed, or oil temperature fluctuates. Use thick onion slices, leave space around edges when filling, and maintain consistent oil temperature.
Final Thoughts
These Jalapeño Popper Stuffed Onion Rings represent the perfect fusion of two beloved appetizers, creating something even greater than the sum of its parts. The crispy-creamy contrast and bold flavors make them irresistible for gatherings or special treats. While they require some patience to assemble, the reactions you’ll get make every minute worthwhile. I love watching faces light up with that first perfect bite! For more mouthwatering recipes like this one, follow me on Pinterest where I’m always sharing new inspirations. Happy cooking!