

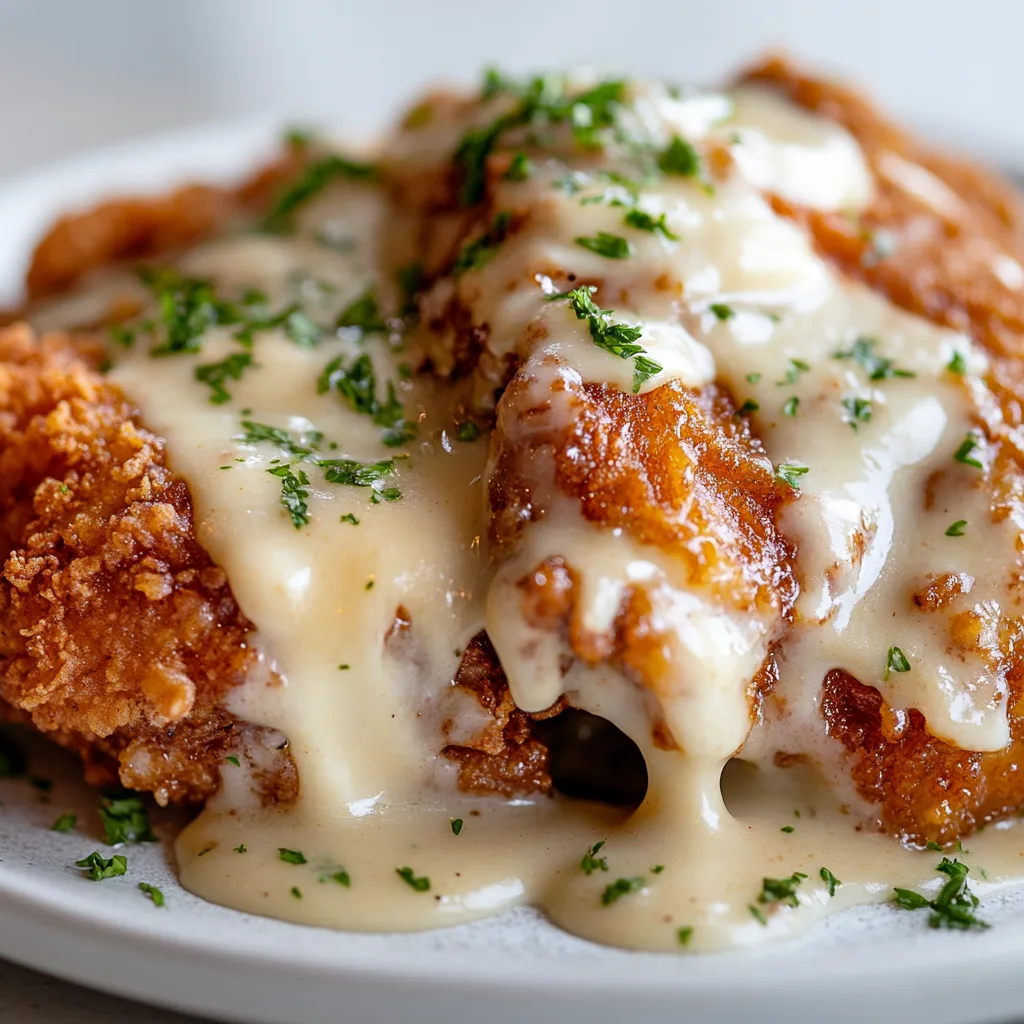
This country fried chicken starts with boneless chicken breasts pounded to an even 1/2 inch and soaked in buttermilk in the refrigerator for at least an hour, or overnight. Each piece gets one thorough coat of flour seasoned with salt, black pepper, smoked paprika, garlic powder and a little cayenne, then fries in 1/2 inch of vegetable oil in a heavy skillet until golden and 165°F in the center.
The gravy is made in the same skillet: most of the oil is poured off, flour is whisked into the remaining drippings, and milk turns it into a smooth gravy seasoned with plenty of black pepper. Allow about 1 hour and 40 minutes in total, most of it the buttermilk soak, for 4 servings.
Table of Contents
Recipe
Print
Crispy Country Fried Chicken with Homemade Gravy – Classic Southern Comfort Food
- Prep Time: 1 hour 15 minutes
- Cook Time: 25 minutes
- Total Time: 1 hour 40 minutes
- Yield: 4 servings
- Category: Dinner, Southern Comfort, Fried Chicken
- Method: Frying, Stovetop
- Cuisine: Southern American
Description
This crispy country fried chicken with creamy homemade gravy is classic Southern comfort food at its best—seasoned, golden-fried chicken smothered in rich pepper gravy. Perfect with mashed potatoes or biscuits!
Ingredients
**For the Chicken:**
4 boneless chicken breasts (or 6 thighs), pounded to 1/2″ thick
2 cups buttermilk
2 cups all-purpose flour
1 tsp salt
1 tsp black pepper
1/2 tsp smoked paprika
1/2 tsp garlic powder
1/4 tsp cayenne pepper
Vegetable oil for frying
**For the Gravy:**
3 tbsp chicken drippings or butter
3 tbsp all-purpose flour
2 cups milk
Salt & black pepper to taste
Pinch of cayenne or white pepper (optional)
Instructions
1. Pound chicken to even thickness. Place in a bowl with buttermilk and refrigerate for at least 1 hour (or overnight).
2. In a shallow bowl, whisk together flour, salt, pepper, paprika, garlic powder, and cayenne.
3. Remove chicken from buttermilk, letting excess drip off. Dredge thoroughly in seasoned flour.
4. Heat 1/2 inch of oil in a heavy skillet over medium-high heat until hot.
5. Fry chicken in batches for 4–5 minutes per side, until golden and internal temp hits 165°F. Remove and drain on paper towels.
6. To make gravy, reduce oil in pan to about 3 tbsp (or add butter). Whisk in flour and cook 1–2 minutes.
7. Gradually whisk in milk, stirring constantly to avoid lumps. Simmer until thickened.
8. Season gravy generously with salt, pepper, and a pinch of cayenne if desired.
9. Serve hot chicken topped with creamy gravy.
Notes
Buttermilk tenderizes the chicken—don’t skip the marinating step!
Use a cast iron skillet for the crispiest results.
Pairs beautifully with mashed potatoes, collard greens, or cornbread.
Country Fried or Chicken Fried?
The two names are used loosely and often for the same thing: a thin cutlet coated in seasoned flour, fried in a skillet and served with gravy. Both are used for beef steak as well as chicken. Some cooks use one name for a dish served with a pale milk gravy and the other for a brown gravy, but that varies from region to region and cook to cook, so the name alone does not tell you much.
What matters is the method. Here that means boneless chicken pounded thin, a buttermilk soak, a single dredge in seasoned flour, shallow frying in a skillet, and a milk gravy made from the drippings.
Preparing the Chicken
Pound It to an Even 1/2 Inch
Chicken breasts are thick at one end and thin at the other. Pounding them to an even 1/2 inch means the whole piece cooks through in the 4 to 5 minutes per side the recipe allows, before the coating gets too dark. Put each breast between two sheets of plastic wrap or in a zip-top bag and pound from the center outward with a meat mallet or the bottom of a heavy pan. Very large breasts can be cut in half first so they fit in the skillet.
Breasts or Thighs
The card uses 4 boneless chicken breasts, or 6 boneless thighs. Thighs are naturally thinner and more uneven, so flatten any thick parts to match. They are a little richer and harder to dry out, but go by the thermometer, not the clock, for either cut.
The Buttermilk Soak
The chicken sits in 2 cups of buttermilk in the refrigerator for at least 1 hour, or overnight. The notes stress not skipping this step: the buttermilk seasons the surface of the meat and leaves a tacky layer that the flour can grip. Keep the bowl covered and in the refrigerator the whole time, never on the counter. When you take the chicken out, throw the buttermilk away, because it has been in contact with raw chicken and cannot be reused for the gravy or anything else.
The Coating
One Dredge in Seasoned Flour
The coating is 2 cups of all-purpose flour whisked with 1 teaspoon each of salt and black pepper, 1/2 teaspoon each of smoked paprika and garlic powder, and 1/4 teaspoon of cayenne. That much cayenne gives a gentle warmth rather than real heat. Whisk the mixture well so every piece gets the same seasoning. There are no eggs and no second dip in this recipe: the buttermilk is the only wet layer, and the chicken goes through the flour once.
Getting the Coating to Stick
Lift each piece out of the buttermilk and let the excess drip off for a few seconds. Too much liquid turns the flour into a paste that slides off in the pan. Lay the chicken in the flour, press it on firmly on both sides and the edges, then lift it and shake off any loose flour. Loose flour falls into the oil, burns and gives both the chicken and the gravy a bitter taste. Using one hand for the wet chicken and the other for the flour keeps your fingers from caking up.
Why the Coating Falls Off
The usual causes are chicken that went into the flour too wet, oil that was not hot enough, a crowded pan, or turning the pieces too early or too often. Let the first side fry undisturbed until it is golden and releases from the pan, then turn it once with tongs or a thin spatula.
Frying
How Much Oil and Which Pan
The card uses 1/2 inch of vegetable oil in a heavy skillet, which comes partway up the chicken. That is why each side is fried separately. A heavy pan holds its heat when the chicken goes in, so the temperature does not crash, and the notes recommend cast iron for a crisper crust. Use a skillet with sides at least 2 inches high so the oil sits well below the rim.
Getting the Oil Ready
The recipe heats the oil over medium-high heat until hot but does not give an exact temperature. The oil is ready when it shimmers and a pinch of the seasoned flour sizzles steadily the moment it lands. If the oil smokes, it is too hot: take the pan off the heat for a minute before you start. Once the chicken is in, aim for a steady, lively sizzle and adjust the burner as you go. The oil cools each time a new batch goes in and climbs again between batches.
Frying Safely in Batches
Fry in batches, with space around each piece; in most skillets that means two pieces at a time. Crowding drops the oil temperature, so the coating soaks up oil instead of crisping. Lay each piece into the pan away from you so any splatter goes the other way, keep the handle turned in, and never let water near the hot oil. Between batches, scoop out any dark bits of flour floating in the oil so they do not burn and stick to the next batch.
When It Is Done
Each side takes 4 to 5 minutes, until deep golden, but color alone is not proof, because the crust can brown before the center is cooked. Check the thickest part with an instant-read thermometer: it should read at least 165°F (74°C). Drain the chicken on paper towels in a single layer. Stacking the pieces traps steam and softens the crust.
The Gravy
What Kind of Gravy This Is
This is a milk gravy made in the frying pan from the drippings, flour and milk, seasoned generously with black pepper, so it is pale, peppery and creamy. It contains no sausage, stock or cream. All its savory flavor comes from the drippings and the browned bits left behind by the chicken.
Pouring Off the Oil
The recipe reduces the oil in the pan to about 3 tablespoons. Take the skillet off the heat and let it cool for a few minutes first, then carefully pour the extra oil into a heatproof container, never down the sink. Leave the golden browned bits in the pan, since they flavor the gravy, but lift out anything black, which tastes burnt. If the drippings look scorched, or there is less than 3 tablespoons, the card allows butter instead.
Cooking the Roux
Return the pan to medium heat and whisk in 3 tablespoons of flour. Cook it, whisking, for 1 to 2 minutes, until the paste bubbles and smells toasty. This cooks out the raw flour taste and is what thickens the gravy.
Adding the Milk Without Lumps
Pour in a small splash of the milk and whisk until it is completely smooth, then add the rest of the 2 cups gradually, whisking constantly. Adding all the milk at once is the main cause of lumps, because the flour seizes into clumps before it can disperse. Bring it to a simmer and keep whisking until it thickens. It is ready when it coats the back of a spoon and a finger drawn through it leaves a clear line.
Seasoning at the End
Season the gravy only once it has thickened. The drippings already carry salt and spices from the coating, so taste before adding salt. Then add plenty of black pepper, plus the optional pinch of cayenne or white pepper if you like.
Too Thick or Too Thin
Milk gravy keeps thickening as it cools, and it sets almost firm on a cold plate. If it is too thick, whisk in a little more milk. If it is too thin, simmer it a minute or two longer. Make the gravy last, while the fried chicken waits, and pour it over just before serving so the coating stays crisp as long as possible.
Serving
The recipe serves the hot chicken topped with the gravy. The notes suggest mashed potatoes, collard greens or cornbread on the side; for greens, our kickin’ collard greens are a good match. The photos show chopped parsley on top, which is not on the card but makes a fresh garnish if you like.
Make-Ahead Options
The soak can run overnight, so the chicken can go into the buttermilk the evening before. The seasoned flour can be mixed ahead and kept covered at room temperature. The frying and the gravy are best done just before serving, because the crust softens as it sits and the gravy thickens.
Storage and Reheating
The card does not give storage times, so follow general food-safety guidance. Refrigerate leftover chicken within 2 hours of cooking, in a shallow covered container, and eat it within 3 to 4 days. Store the gravy separately in its own container. Milk-based gravy keeps for a shorter time, so use it within 1 to 2 days.
Reheat the chicken in an oven set no lower than 325°F (160°C), on a rack over a baking sheet, until it reaches 165°F (74°C). The oven helps the coating firm up again, although it will not be as crisp as freshly fried; a microwave softens it further. Reheat the gravy in a saucepan over medium heat, whisking in a splash of milk to loosen it, until it comes to a boil. The card does not cover freezing.
Frequently Asked Questions
Can I skip the buttermilk soak?
The notes say not to. Without it, the flour has nothing tacky to cling to and the chicken is less seasoned, so the soak is worth the hour.
Why is my gravy lumpy?
Usually the milk went in too fast. Whisk in a small splash first until smooth, then add the rest gradually. If lumps remain, whisk hard off the heat, or pour the gravy through a fine sieve.
How is this different from bone-in fried chicken?
This recipe uses thin boneless cutlets that fry in minutes in a shallow layer of oil and come with gravy. For bone-in pieces fried longer in deeper oil, see our buttermilk-marinated bone-in fried chicken.
Can I make the gravy with butter?
You can, because the card allows butter in place of the drippings, which is useful if the oil has darkened. The gravy will be milder, without the flavor of the browned bits from the chicken.