

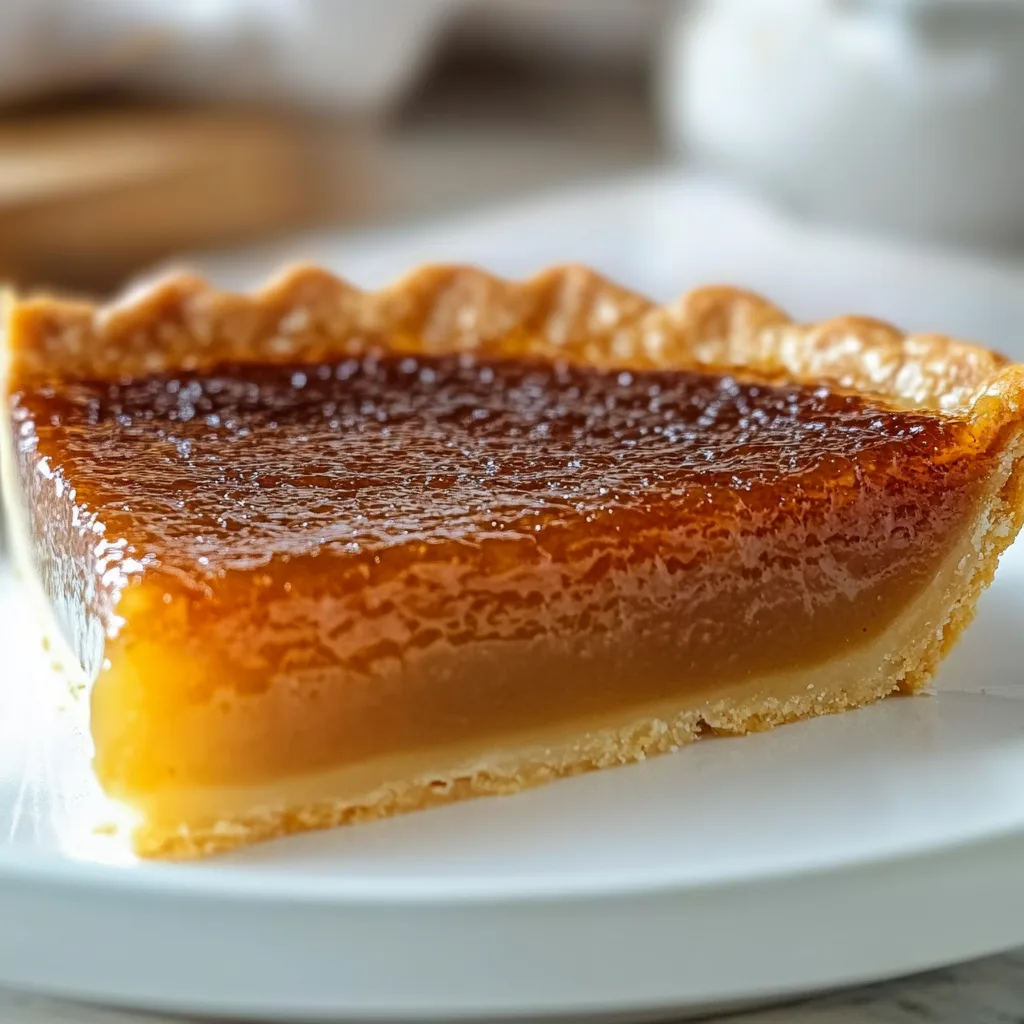
Burnt Honey Pie is a dessert that transforms ordinary honey into something extraordinary through a simple caramelization process that deepens its flavor profile. The first time I made this pie, the kitchen filled with an intoxicating aroma that had everyone wandering in to investigate. The burnt honey creates a complex sweetness with subtle bitter notes that perfectly balances the creamy custard filling. It’s like a sophisticated cousin to chess pie, but with a golden amber hue and a flavor that lingers delightfully on your palate. If you enjoy my Christmas Cheesecake with Cranberry Jam, you’ll adore this pie’s similar balance of sweetness and complexity.
Table of Contents
Recipe
Print
Delicious Burnt Honey Pie Recipe – Sweet, Crispy & Irresistible Dessert
- Prep Time: 30 minutes
- Cook Time: 40 minutes
- Total Time: 1 hour 10 minutes
- Yield: 1 pie (8 slices)
- Category: Dessert, Pie
- Method: Baking
- Cuisine: American
- Diet: Vegetarian
Description
This burnt honey pie is a silky, custard-style dessert with rich caramelized honey flavor and a crackly golden top. A unique twist on classic pie that’s sweet, smooth, and irresistibly crispy on top.
Ingredients
**For the Crust:**
1 1/4 cups all-purpose flour
1/2 tsp salt
1/2 cup cold unsalted butter, cubed
3–4 tbsp ice water
**For the Filling:**
1/2 cup honey
1/4 cup sugar
1/4 cup unsalted butter
1/4 tsp salt
1/2 cup heavy cream
2 large eggs
1 tsp vanilla extract
Instructions
1. Make the crust: In a bowl, combine flour and salt. Cut in cold butter until mixture resembles coarse crumbs.
2. Add ice water 1 tbsp at a time, mixing just until dough comes together. Shape into a disc, wrap, and chill for 30 minutes.
3. Preheat oven to 350°F (175°C). Roll out crust and press into a 9-inch pie dish. Prick base with a fork. Par-bake for 10 minutes, then set aside.
4. In a saucepan, heat honey over medium heat until it darkens slightly and smells caramelized, about 3–4 minutes (don’t let it burn!).
5. Add sugar, butter, and salt. Stir until smooth, then remove from heat.
6. Whisk in cream, eggs, and vanilla until fully combined.
7. Pour filling into pre-baked crust.
8. Bake 35–40 minutes or until center is set and top is golden. Let cool completely before slicing.
9. Optional: Dust with flaky salt or powdered sugar before serving.
Notes
Burnt honey intensifies flavor—don’t skip this step, but watch closely!
Pairs beautifully with whipped cream or vanilla ice cream.
Chill before slicing for cleaner cuts.
Why You’ll Love This Burnt Honey Pie
A Symphony of Textures
The contrast between the flaky, buttery crust and the silky-smooth custard filling creates a textural paradise that makes each bite pure bliss. The top develops this delicate, paper-thin crystallized layer that shatters gently against your fork before giving way to the velvety custard beneath. I love watching people take their first bite – there’s always that moment of surprise when they experience how the filling is simultaneously firm enough to hold its shape when sliced yet melts effortlessly in your mouth. The slight chew from the honey’s caramelization adds another dimension that elevates this pie beyond ordinary custard desserts.
Complex Flavor Development
The magic of this pie lies in the caramelization process that transforms ordinary honey into something extraordinary. As you cook the honey, it darkens from golden to amber, developing toasted, almost nutty undertones with a subtle bitterness that balances the sweetness perfectly. This depth of flavor simply can’t be achieved with regular honey. The vanilla and salt work in harmony with the burnt honey, enhancing its complexity rather than competing with it. I find it fascinating how the flavor continues to develop as the pie cools – what starts as sweet and straightforward evolves into something nuanced and sophisticated with notes of caramel, butterscotch, and even a whisper of coffee.
Essential Tips & Tricks
Mastering the Honey Burning Process
The key to this pie is getting the honey caramelization just right – you want it dark amber, not black. I recommend using a light-colored stainless steel pan so you can clearly see the color changing. Keep the heat medium-low and stir constantly; honey can go from perfect to burnt beyond repair in seconds. You’ll know it’s ready when it smells toasty and reaches a deep amber color similar to maple syrup. Don’t panic if it smokes slightly – that’s normal! But if it smells acrid or bitter, you’ve gone too far. Always have your cream measured and ready to add the moment your honey reaches the right color – this stops the cooking process immediately.
Perfecting Your Custard Technique
For the silkiest filling, temperature control is crucial. Always temper your eggs by slowly adding the warm honey mixture while whisking constantly to prevent scrambling. I like to strain the final custard through a fine-mesh sieve to catch any potential egg bits for the smoothest result. When baking, place your pie on a preheated baking sheet – this helps cook the bottom crust properly. The filling should jiggle slightly in the center when done, like barely-set Jell-O. Don’t overbake! The residual heat will continue cooking the filling as it cools. If you’re having trouble with custard pies, try my Gluten-Free Sticky Toffee Pudding first as a simpler introduction to custard-based desserts.
Serving Ideas & Creative Variations
Perfect Pairings and Presentation
This Burnt Honey Pie stands beautifully on its own, but a few thoughtful additions can elevate it further. A dollop of lightly whipped cream with just a touch of vanilla creates a perfect cool, creamy contrast to the rich filling. For special occasions, I like to garnish with a sprinkle of flaky sea salt and a drizzle of extra honey (regular, not burnt). Serve slices slightly chilled but not cold – about 30 minutes out of the refrigerator achieves the perfect temperature where flavors bloom fully on your palate. For a stunning presentation, place the pie on a wooden board surrounded by fresh seasonal fruits and edible flowers.
Seasonal Adaptations and Flavor Twists
The versatility of Burnt Honey Pie makes it perfect for creative variations throughout the year. In summer, try adding fresh berries or stone fruits either baked into the filling or macerated and spooned over each slice. Fall calls for warming spices – a pinch of cinnamon, cardamom, or nutmeg whisked into the custard creates a cozy variation. For a holiday twist, stir in a tablespoon of bourbon or rum with the vanilla. You could also experiment with different honey varieties – buckwheat honey creates an intensely complex version, while orange blossom honey adds subtle citrus notes. For more seasonal dessert ideas, check out my Brown Butter Skillet Chocolate Chip Cookie which uses a similar flavor-enhancing technique.
Storage & Troubleshooting Guide
Proper Storage Methods
For optimal freshness, store your Burnt Honey Pie in the refrigerator, loosely covered with foil rather than plastic wrap, which can create condensation and soften your crust. The pie will keep beautifully for up to 4 days, though the crust will gradually soften a bit as it sits. I don’t recommend freezing this pie – the custard structure can break down during thawing, resulting in a weepy filling and compromised texture. If you need to make components ahead, the pie dough can be frozen for up to a month, and the burnt honey itself can be prepared up to two weeks in advance and stored in an airtight container in the refrigerator.
Solving Common Pie Problems
If your filling develops small cracks, don’t worry – this is purely cosmetic and won’t affect the flavor. Simply cover with whipped cream before serving! If your pie isn’t setting properly, it likely needs a few more minutes in the oven or wasn’t baked at a high enough temperature. The filling should reach 175°F internally when done. For a soggy bottom crust, try blind baking the crust first until lightly golden before adding the filling. And if your honey darkens too quickly during the burning process, immediately remove it from heat and transfer to a cool bowl to stop the cooking. Remember that different honey varieties have different sugar compositions and may caramelize at slightly different rates.
Frequently Asked Questions
What type of honey works best for Burnt Honey Pie?
I recommend using a mild, light-colored honey like clover or wildflower. These varieties caramelize beautifully without overwhelming the custard with too many competing flavor notes.
Can I make Burnt Honey Pie without a food processor?
Absolutely! You can make the crust by hand using a pastry cutter or two forks to cut the butter into the flour until pea-sized crumbs form.
Why did my custard filling curdle?
This typically happens when eggs cook too quickly. Always temper your eggs by adding the hot honey mixture gradually while whisking constantly, and strain the final mixture.
How do I know when my Burnt Honey Pie is done baking?
The pie is done when the edges are set but the center still has a slight wobble, similar to Jell-O. It will continue to set as it cools.
Can I use store-bought pie crust for this Burnt Honey Pie?
Yes! While homemade crust provides the best flavor and texture, a high-quality store-bought crust works well when you’re short on time.
Final Thoughts
This Burnt Honey Pie has become one of my signature desserts – the one friends and family request time and again. There’s something magical about transforming simple honey into a complex, caramelized custard that surprises and delights with every bite. The process of making it feels almost meditative, from watching the honey darken to the satisfaction of pulling a perfectly golden pie from the oven. I hope you’ll try this recipe and discover the joy of Burnt Honey Pie for yourself. For more dessert inspiration, visit my Pinterest board where I’m always adding new ideas!