

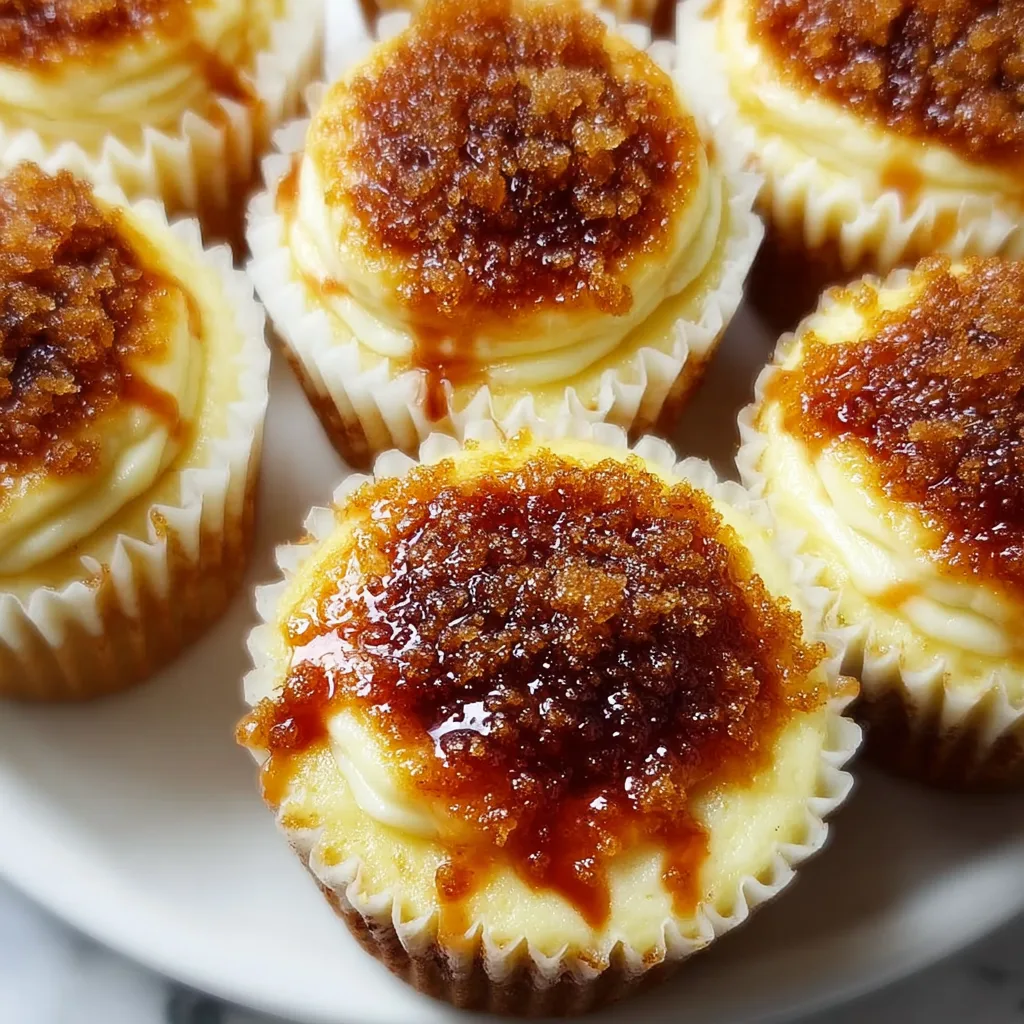
Vanilla Bean Crème Brûlée Cheesecake Cupcakes combine two of my absolute favorite desserts into one irresistible bite-sized treat. The silky smooth cheesecake base infused with fragrant vanilla bean specks meets the crackling, caramelized sugar topping that makes crème brûlée so magical. I’ve spent years perfecting this recipe, and let me tell you—the moment you crack through that brittle sugar shell into the creamy cheesecake beneath, you’ll understand why these little beauties are always the first to disappear at any gathering. They’re elegant enough for special occasions but simple enough to make when you’re craving something truly special, like my Tuxedo Cake.
Table of Contents
Recipe
Print
Vanilla Bean Crème Brûlée Cheesecake Cupcakes
- Prep Time: 15 minutes
- Cook Time: 20 minutes
- Total Time: 2 hours 35 minutes
- Yield: 12 cupcakes
- Category: Dessert
- Method: Baking
- Cuisine: French-Inspired
- Diet: Vegetarian
Description
These Vanilla Bean Crème Brûlée Cheesecake Cupcakes are a luxurious dessert featuring creamy vanilla cheesecake with a crisp caramelized sugar topping. With rich flavor and elegant presentation, they’re perfect for special occasions or when you want an impressive homemade treat.
Ingredients
For the Crust:
1 cup graham cracker crumbs
3 tablespoons melted butter
For the Cheesecake Filling:
12 oz cream cheese, softened
1/2 cup granulated sugar
2 large eggs
1/2 cup heavy cream
1 teaspoon vanilla bean paste (or vanilla extract)
For the Brûlée Topping:
1/4 cup granulated sugar
Instructions
1. Preheat oven to 325°F (165°C) and line a muffin tin with cupcake liners.
2. In a bowl, mix graham cracker crumbs with melted butter.
3. Press a small amount into each liner to form the crust.
4. In another bowl, beat cream cheese until smooth.
5. Add sugar and mix until creamy.
6. Add eggs one at a time, mixing well after each addition.
7. Stir in heavy cream and vanilla bean paste.
8. Divide the batter evenly among the cupcake liners.
9. Bake for 18–22 minutes until set but slightly jiggly in the center.
10. Let cool completely, then refrigerate for at least 2 hours.
11. Before serving, sprinkle a thin layer of sugar on top of each cupcake.
12. Use a kitchen torch to caramelize the sugar until golden and crisp.
13. Allow topping to harden, then serve.
Notes
Do not overbake to keep the cheesecake creamy.
Chill thoroughly before adding the brûlée topping.
Use a kitchen torch for best results; broiling is less precise.
Serve immediately after caramelizing for the perfect crunch.
Why You’ll Love This Vanilla Bean Crème Brûlée Cheesecake Cupcakes
Perfect Balance of Textures and Flavors
There’s something utterly magical about the contrasting textures in these cupcakes. The buttery graham cracker crust provides a subtle crunch, while the cheesecake center is velvety smooth with those gorgeous little vanilla bean flecks running throughout. But the star of the show is definitely that caramelized sugar topping that shatters with the gentlest tap of your spoon. The vanilla flavor isn’t just one-dimensional—it’s deep, aromatic, and complex, especially when you use real vanilla beans instead of extract. Each bite delivers the perfect balance of sweet, creamy, and that slight bitterness from the caramelized sugar.
Make-Ahead Convenience with Impressive Results
These cupcakes are a dessert lover’s dream because they actually benefit from being made ahead. The cheesecake portion needs time to set properly, and the flavors deepen beautifully overnight in the refrigerator. This makes them perfect for entertaining—do the work a day before, and just before serving, sprinkle with sugar and torch for that dramatic finish. Your guests will be absolutely impressed when you bring out individual crème brûlée cheesecakes with their perfectly caramelized tops, never suspecting how manageable the process actually was. It’s that rare dessert that’s both convenient and showstopping.
Essential Tips & Tricks
Mastering the Perfect Cheesecake Base
The foundation of these cupcakes is all about achieving that silky-smooth texture without cracks or bubbles. Always start with room temperature ingredients—especially the cream cheese and eggs—to ensure everything blends seamlessly. I like to beat the cream cheese alone first until completely smooth before adding any other ingredients. When mixing, use a lower speed to avoid incorporating too much air, which can cause cracks during baking. The water bath method is non-negotiable here; it creates gentle, even heat that helps the cheesecake cook without drying out. I’ve found that filling the muffin cups about 3/4 full gives the perfect height for that classic New York cheesecake density.
The Art of the Perfect Brûlée Topping
Creating that perfect caramelized sugar crust requires a bit of finesse, but it’s actually quite simple once you know the tricks. First, make sure your cheesecakes are thoroughly chilled—I recommend at least 4 hours, but overnight is ideal. Just before serving, sprinkle a thin, even layer of granulated sugar over each cupcake. Don’t be tempted to use brown sugar here; regular white sugar creates the cleanest, most satisfying crack. Hold your kitchen torch about 2-3 inches away from the surface and move it constantly in small circular motions.
The goal is to melt and caramelize the sugar without burning it or heating the cheesecake beneath. If you don’t have a torch, a quick visit under a preheated broiler works too—just watch them like a hawk!
Serving Ideas & Creative Variations
Elegant Presentation Techniques
Elevate these already impressive cupcakes with some thoughtful presentation touches. I love serving them on a dark slate board which makes the golden caramelized tops and creamy centers really pop visually. For an extra touch of elegance, place each cupcake in a small glass dessert dish and garnish the plate with fresh berries, a mint leaf, or a light dusting of powdered sugar around the edges. A tiny dollop of lightly whipped cream on the side provides a nice temperature and texture contrast. For dinner parties, I sometimes place a single edible flower petal on each cupcake after torching—the heat slightly wilts it, creating a beautiful artistic effect that guests always comment on.
Flavor Twists and Seasonal Adaptations
While the classic vanilla bean version is divine, these cupcakes are wonderfully adaptable to different flavor profiles. For a citrus twist, add lemon or orange zest to both the crust and the filling—this brightens everything up for spring and summer gatherings. During fall, I love incorporating a cinnamon-spiced graham cracker crust and a touch of maple syrup in the filling, reminiscent of my Cinnamon Roll Cookies. For chocolate lovers, try adding a thin layer of ganache beneath the brûlée topping, or mix in some espresso powder for a tiramisu-inspired version. Around the holidays, a hint of peppermint extract and crushed candy cane garnish turns these into festive treats that everyone will remember.
Storage & Troubleshooting Guide
Proper Storage for Maximum Freshness
These cheesecake cupcakes need to be stored properly to maintain their delicate texture and prevent them from absorbing refrigerator odors. Without the caramelized topping, they’ll keep beautifully in an airtight container in the refrigerator for up to 5 days. The key is to let them cool completely before refrigerating and to avoid stacking them, which can damage their tops. If you need to layer them, place a piece of parchment between each layer. For longer storage, these cupcakes freeze exceptionally well—wrap each one individually in plastic wrap, then aluminum foil, and freeze for up to 2 months. Just thaw overnight in the refrigerator and add the sugar topping just before serving.
Troubleshooting Common Issues
If your cheesecake cupcakes crack during baking, the likely culprit is either overmixing (which incorporates too much air) or baking at too high a temperature. Next time, mix on low speed and ensure your oven is properly calibrated. For sunken centers, the cupcakes probably needed a few more minutes in the oven—cheesecake should be just slightly jiggly in the center when done.
If your caramelized topping isn’t hardening properly, you’re either not using enough sugar or your torch isn’t hot enough. Make sure to use a thin, even layer of granulated sugar and hold the torch close enough to fully melt the sugar. Remember that the sugar will continue to harden as it cools, so give it a minute before testing that satisfying crack!
Frequently Asked Questions
Can I make Vanilla Bean Crème Brûlée Cheesecake Cupcakes without a kitchen torch?
Yes! You can use your oven’s broiler instead. Place the sugar-topped cheesecakes on the highest rack, about 4 inches from the heat source, and broil for 1-2 minutes, watching constantly to prevent burning.
How far in advance can I make these cupcakes?
You can make the cheesecake portion up to 3 days ahead and store in the refrigerator. Add the caramelized sugar topping just before serving for the best texture contrast.
Can I substitute vanilla extract for the vanilla beans?
Absolutely, though you’ll lose some of the visual appeal and depth of flavor. Use 1½ teaspoons of pure vanilla extract or vanilla bean paste instead of one whole vanilla bean.
Why did my cheesecakes sink in the middle?
Cheesecakes typically sink when they’re underbaked or when the oven temperature fluctuates too much. Try baking a few minutes longer next time and avoid opening the oven door during baking.
Can these be made in mini muffin tins for bite-sized versions?
Yes! Reduce the baking time to about 12-15 minutes. They make adorable one-bite desserts for parties, but be extra gentle when applying the sugar topping.
Final Thoughts
These Vanilla Bean Crème Brûlée Cheesecake Cupcakes represent the perfect marriage of two classic desserts, combining creamy indulgence with that unforgettable crackling sugar top. They’ve become my signature dessert for good reason—they’re impressive without being intimidating to make. The joy of watching someone crack through that caramelized shell into the velvety cheesecake beneath never gets old. Whether you’re celebrating something special or simply treating yourself, these little treasures are worth every minute spent making them. For more delicious inspiration, check out my Pinterest page where I’m always sharing new dessert ideas!