

Stuffed Manicotti with Rich Meat Sauce is what comfort food dreams are made of. There’s something magical about those tender pasta tubes filled with a creamy ricotta mixture and smothered in a robust meat sauce that makes my heart sing. I’ve been perfecting this recipe for years, and it’s become my go-to when I need to impress dinner guests or simply want to wrap my family in a warm culinary hug. The contrast between the velvety cheese filling and the hearty sauce creates a perfect balance that will have everyone asking for seconds. Trust me, this isn’t just dinner—it’s an experience worth savoring.
Table of Contents
Recipe
Print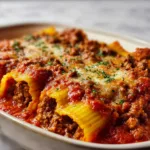
Stuffed Manicotti with Rich Meat Sauce | Classic Italian Pasta Recipe
- Prep Time: 25 minutes
- Cook Time: 35 minutes
- Total Time: 1 hour
- Yield: 6 servings
- Category: Main Dish, Pasta
- Method: Baking
- Cuisine: Italian
Description
This stuffed manicotti with rich meat sauce is a hearty, comforting Italian dinner classic. Tubes of pasta are filled with a creamy ricotta cheese mixture, topped with savory meat sauce and melty mozzarella, then baked until bubbling. It’s the kind of dish that brings everyone to the table.
Ingredients
For the Filling:
1 (15 oz) container ricotta cheese
1 cup shredded mozzarella cheese
1/2 cup grated Parmesan cheese
1 egg
1 tsp Italian seasoning
Salt & pepper, to taste
For the Meat Sauce:
1 tbsp olive oil
1/2 lb ground beef
1/2 lb Italian sausage
1 small onion, chopped
2 cloves garlic, minced
1 (24 oz) jar marinara sauce
1 tsp dried basil
Salt & pepper, to taste
Other:
12 manicotti pasta shells
1 cup shredded mozzarella (for topping)
Fresh parsley or basil, for garnish
Instructions
1. Preheat oven to 375°F (190°C). Lightly grease a 9×13 baking dish.
2. Cook manicotti shells according to package directions until al dente. Drain and set aside.
3. In a skillet, heat olive oil over medium heat. Add onion and cook 3–4 minutes. Add garlic, beef, and sausage. Cook until browned. Drain excess fat.
4. Stir in marinara sauce, dried basil, salt, and pepper. Simmer for 10 minutes.
5. In a bowl, mix ricotta, mozzarella, Parmesan, egg, Italian seasoning, salt, and pepper until smooth.
6. Fill each shell with cheese mixture using a piping bag or spoon.
7. Spread a layer of meat sauce in the baking dish. Arrange filled manicotti on top.
8. Pour remaining sauce over the shells and top with shredded mozzarella.
9. Cover with foil and bake 25 minutes. Uncover and bake 10 more minutes until bubbly and golden.
10. Garnish with fresh herbs before serving.
Notes
• Don’t overcook pasta—al dente makes stuffing easier.
• Use a freezer bag with a snipped corner to pipe filling cleanly.
• This dish freezes well before baking—just add 10 minutes to bake time from frozen.
Why You’ll Love This Stuffed Manicotti with Rich Meat Sauce
Perfect Texture Combination
There’s something incredibly satisfying about cutting into a perfectly baked manicotti. The pasta maintains just the right amount of bite while the cheese filling stays creamy and luscious. I love how the exterior gets slightly crispy where the sauce has caramelized against the pasta. The meat sauce develops deep, complex flavors as it simmers, with the tomatoes breaking down into a velvety consistency that clings to every bite. When you take that first forkful combining the tender pasta, creamy filling, and rich sauce, it’s a textural symphony that makes your taste buds dance with joy.
Make-Ahead Magic
One of my favorite things about this dish is its incredible versatility for meal planning. You can assemble the entire dish up to 24 hours before baking, making it perfect for entertaining or busy weeknights. The flavors actually improve as they meld together in the refrigerator. I often make a double batch and freeze half for those evenings when cooking feels impossible. There’s something deeply comforting about knowing a homemade meal awaits with minimal effort. Plus, the pasta absorbs just enough sauce while sitting, creating an even more flavorful final dish when you finally bake it.
Essential Tips & Tricks
Perfecting the Filling
The secret to exceptional manicotti lies in the cheese blend. While ricotta forms the base, adding freshly grated Parmesan and mozzarella creates dimension and depth. I always drain my ricotta in a fine-mesh sieve for about 30 minutes before mixing—this prevents a watery filling that can make your pasta soggy. Don’t skimp on the fresh herbs! Chopped basil and parsley bring brightness that cuts through the richness. A hint of freshly grated nutmeg might seem unusual, but it’s my secret weapon that adds warmth without being identifiable. For extra flavor, try folding in some roasted garlic.
Filling Without Frustration
Let’s be honest—stuffing manicotti tubes can be a messy challenge. My game-changing technique involves piping the filling instead of spooning it. Simply transfer your cheese mixture to a zip-top bag, snip off one corner, and squeeze it directly into the pasta tubes. For maximum ease, cook your manicotti just until al dente (about 6 minutes), then shock in ice water to stop the cooking. This keeps them firm enough to handle without breaking. Another time-saving trick: lay the tubes on a clean kitchen towel while filling them—it absorbs excess moisture and prevents sliding around on your work surface.
Serving Ideas & Creative Variations
Perfect Pairings
This hearty dish deserves thoughtful accompaniments that complement without overwhelming. I love serving manicotti with a crisp Caesar salad with homemade garlic croutons that provide a refreshing contrast to the rich pasta. A side of garlic bread is perfect for sopping up extra sauce—because wasting that liquid gold should be illegal! For a complete Italian-inspired feast, add some simple roasted vegetables like asparagus or zucchini drizzled with good olive oil and sea salt. A medium-bodied red wine like Chianti or Montepulciano makes the perfect beverage pairing, enhancing the tomato-based sauce beautifully.
Exciting Twists
While traditional manicotti is divine, don’t be afraid to experiment! My favorite variation swaps the meat sauce for a creamy tomato garlic pasta sauce with spinach. For a protein change, try using ground turkey or chicken instead of beef, adding extra herbs to compensate for the milder flavor. Seafood lovers might enjoy a shrimp and crab filling mixed with the ricotta and a touch of lemon zest. For a vegetarian version, replace the meat sauce with a robust mushroom ragu using portobello and cremini mushrooms. Add a pinch of red pepper flakes to the sauce for a subtle heat that wakes up your taste buds.
Storage & Troubleshooting Guide
Proper Storage
Leftover manicotti should be cooled completely before transferring to airtight containers. In the refrigerator, it will stay fresh for 3-4 days, making it perfect for meal prep. When reheating, sprinkle a few drops of water over the pasta before covering with microwave-safe wrap—this creates steam that prevents the pasta from drying out. For freezing, I prefer assembling the dish in disposable aluminum pans, covering tightly with plastic wrap and then foil. Label with the date and contents (I’ve learned this lesson the hard way!). Frozen manicotti will maintain optimal quality for up to three months.
Common Fixes
If your manicotti shells tear while filling, don’t panic! Simply place the torn side down in the baking dish and no one will know. Dealing with a watery sauce? Simmer it uncovered for 5-10 minutes longer to reduce excess moisture. If your filling seems too firm to pipe easily, add a tablespoon of milk to loosen it slightly. For sauce that’s too acidic, add a pinch of baking soda or a teaspoon of sugar to balance the flavors. And if your top layer of cheese is browning too quickly during baking, loosely cover the dish with foil for the remainder of the cooking time.
Frequently Asked Questions
Can I make Stuffed Manicotti with Rich Meat Sauce ahead of time?
Absolutely! Assemble the dish up to 24 hours in advance, cover with plastic wrap, and refrigerate. Add an extra 10-15 minutes to the baking time if cooking straight from the refrigerator.
What’s the best way to prevent my manicotti from breaking?
Don’t overcook the pasta—aim for very al dente (about 6 minutes). Cool them in ice water, then handle gently. Lay them on a kitchen towel while filling to prevent sliding.
Can I freeze leftover manicotti?
Yes! Cool completely, then wrap tightly in plastic wrap and foil. Freeze for up to 3 months. Thaw overnight in the refrigerator before reheating at 350°F until hot throughout.
What can I substitute for ricotta cheese?
Cottage cheese works well—just drain it first and pulse briefly in a food processor for a smoother texture. Mascarpone or a combination of cream cheese and sour cream also makes a delicious alternative.
How do I know when my manicotti is done baking?
The dish should be bubbling around the edges, the cheese on top melted and lightly golden, and the internal temperature should reach 165°F when tested with a thermometer.
Final Thoughts
This Stuffed Manicotti with Rich Meat Sauce has earned its place as a beloved favorite in my recipe collection. There’s something deeply satisfying about creating a dish that brings people together around the table with eager anticipation. The combination of tender pasta, creamy filling, and robust sauce creates a comfort food masterpiece that feels special enough for celebrations yet accessible for family dinners. I hope you’ll give this recipe a try and make it your own. For more delicious inspiration, check out my Pinterest board where I’m always adding new ideas to elevate your home cooking experience.