

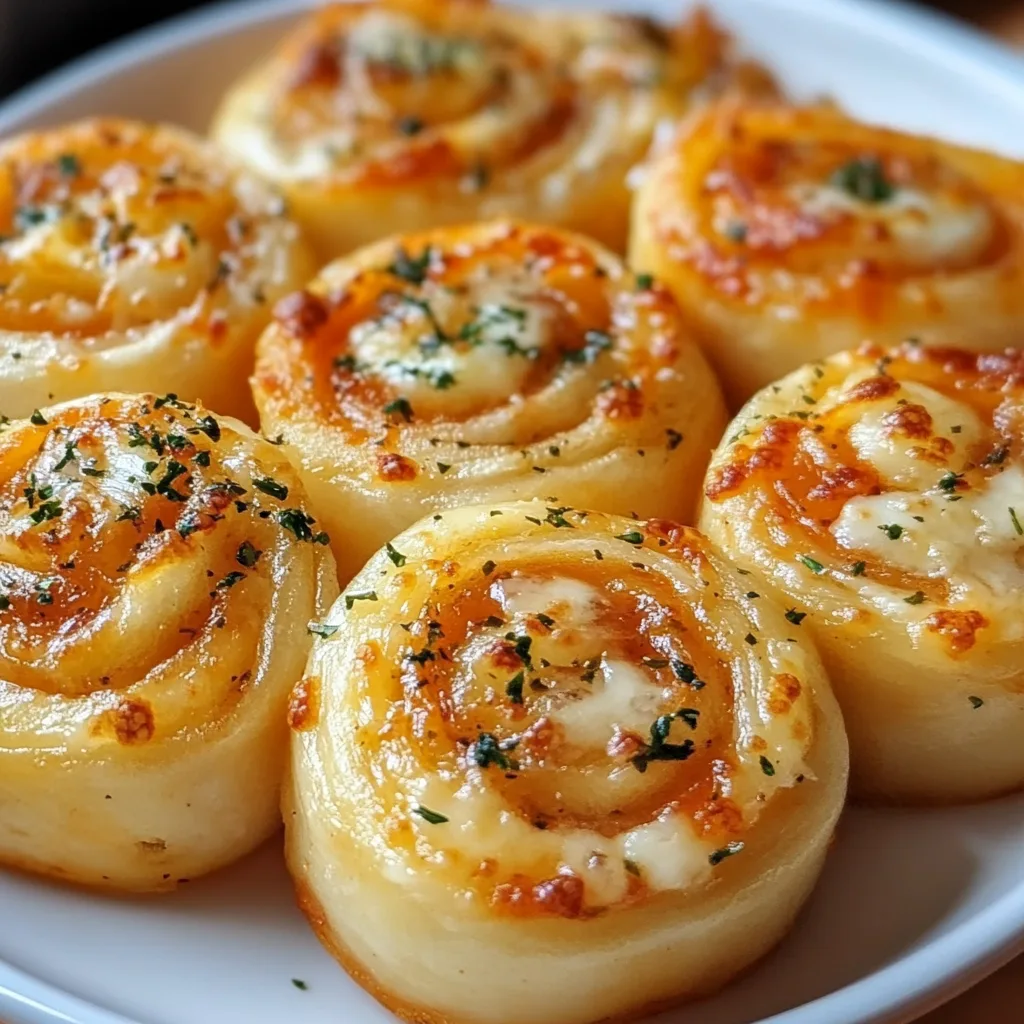
These Pizza Rolls with Mozzarella and Garlic Butter are what happen when comfort food meets gourmet simplicity. Imagine biting into warm, pillowy bread swirled with gooey mozzarella, zesty marinara, and that unmistakable kiss of garlic butter that makes everything better. I’ve been perfecting this recipe for years, and trust me—once you smell these baking in your oven, Sunday dinners will never be the same. They’re impressive enough for company but easy enough for a cozy night in when you just need something soul-warming. Let me show you how to create these little bundles of joy that’ll have everyone reaching for seconds.
Table of Contents
Recipe
Print
Delicious Pizza Rolls with Mozzarella and Garlic Butter Recipe | Easy & Cheesy Snack
- Prep Time: 10 minutes
- Cook Time: 15 minutes
- Total Time: 25 minutes
- Yield: 16 rolls
- Category: Appetizer, Snack, Party Food
- Method: Baking, Rolling
- Cuisine: Italian-American
Description
These Delicious Pizza Rolls with Mozzarella and Garlic Butter are crispy, gooey, and bursting with cheesy pizza flavor! Perfect as a snack, appetizer, or quick party bite — easy to make and impossible to resist.
Ingredients
**For the Pizza Rolls**
1 package refrigerated pizza dough (or homemade dough)
½ cup pizza sauce
1 ½ cups shredded mozzarella cheese
¼ cup mini pepperoni slices (optional)
¼ tsp Italian seasoning
¼ tsp crushed red pepper flakes (optional)
**For the Garlic Butter Glaze**
3 tbsp unsalted butter, melted
2 cloves garlic, minced
1 tbsp chopped parsley
2 tbsp grated Parmesan cheese
**For Serving**
Extra pizza sauce for dipping
Instructions
1. Preheat oven to 400°F (200°C). Line a baking sheet with parchment paper.
2. Roll out the pizza dough into a large rectangle (about 12×8 inches).
3. Spread pizza sauce evenly over the dough, leaving a ½-inch border.
4. Sprinkle mozzarella cheese evenly on top, followed by mini pepperoni and Italian seasoning.
5. Starting from the long edge, tightly roll up the dough into a log.
6. Slice into 1-inch rounds and place on the prepared baking sheet, cut side up.
7. Bake for 12–15 minutes, or until golden brown and cheese is bubbling.
8. While baking, make the garlic butter: melt butter in a small bowl, then stir in garlic, parsley, and Parmesan.
9. Brush warm pizza rolls generously with garlic butter right out of the oven.
10. Serve with extra pizza sauce for dipping — cheesy, garlicky perfection in every bite!
Notes
Use any toppings you love — sausage, mushrooms, or veggies work great!
Make them ahead and freeze before baking; just pop them straight into the oven when ready.
For a crispy finish, bake on a pizza stone.
These rolls reheat beautifully — just toast them at 350°F for 5 minutes.
Why You’ll Love These Pizza Rolls with Mozzarella and Garlic Butter
Perfect Balance of Flavors and Textures
There’s something magical about the combination of melted mozzarella and garlic butter that makes these rolls irresistible. The cheese gets perfectly stretchy while the outside develops a golden crust that’s just the right amount of chewy. I love how the tangy marinara cuts through the richness, creating that perfect pizza flavor profile we all crave. The beauty is in the balance—each bite delivers that comforting pizza taste without the mess of traditional slices. Plus, the aroma that fills your kitchen while these bake is practically therapeutic after a long day.
Versatile for Any Occasion
Whether you’re hosting game day or need a crowd-pleasing appetizer, these rolls are your new best friend. They’re perfectly portable and ideal for everything from casual gatherings to more upscale dinner parties. I’ve served them at birthday celebrations, holiday gatherings, and simple family dinners—they disappear within minutes every single time! The best part? You can prep them ahead and bake just before serving, making them a stress-free option when you’re juggling multiple dishes. They’re also wonderfully adaptable for picky eaters since you can customize fillings individually.
Essential Tips & Tricks
Mastering the Dough
The foundation of extraordinary pizza rolls starts with getting the dough just right. I’ve found that letting refrigerated dough come to room temperature for at least 30 minutes makes all the difference in workability. When rolling it out, aim for about ¼-inch thickness—too thin and it’ll tear, too thick and your rolls will be doughy inside. A light dusting of flour prevents sticking, but don’t go overboard or you’ll dry out the dough. The real secret? Give the dough a gentle stretch rather than forcing it, which keeps the texture light and airy once baked.
The Perfect Garlic Butter Technique
Creating that heavenly garlic butter is where many home cooks miss out on flavor potential. Start with unsalted butter so you can control the seasoning, and make sure it’s softened but not melted. I mince fresh garlic extra fine (or use a microplane) and mix it with the butter at least 30 minutes before using to let the flavors infuse. For an extra dimension, add a pinch of red pepper flakes and finely chopped fresh parsley. Brush the rolls generously before baking, then again lightly when they come out of the oven for that professional restaurant-quality finish.
Serving Ideas & Creative Variations
Complementary Sides and Dips
These pizza rolls shine even brighter with the right accompaniments. I love serving them with a warm marinara for dipping—the extra sauce brings everything full circle. For a creamy contrast, offer a small bowl of ranch dressing or garlic aioli alongside. To make it a complete meal, pair with a simple arugula salad dressed with lemon and olive oil; the peppery greens cut through the richness perfectly. For a heartier option, they’re wonderful with my favorite Cheeseburger Soup for the ultimate comfort food experience that’ll have everyone asking for your secrets.
Mix-and-Match Fillings
While the classic mozzarella version is divine, don’t be afraid to experiment with fillings! Create a breakfast version with scrambled eggs, cheddar, and crumbled bacon. For an elevated twist, try caramelized onions, goat cheese, and thyme. My family goes crazy for the pepperoni and provolone variation with a sprinkle of oregano. You can even make a sweet version with cinnamon sugar butter and cream cheese! The key is not overfilling—about two tablespoons of ingredients per roll ensures they’ll seal properly and won’t burst during baking.
Storage & Troubleshooting Guide
Keeping Them Fresh
To maintain that fresh-baked quality, store any leftover pizza rolls in an airtight container in the refrigerator for up to three days. When you’re ready to enjoy them again, avoid the microwave which makes them soggy. Instead, reheat in a 350°F oven for 5-7 minutes until warmed through. For longer storage, these freeze beautifully! Arrange fully cooled rolls on a baking sheet, freeze until solid, then transfer to freezer bags. They’ll keep for up to two months. Reheat frozen rolls directly from the freezer at 375°F for about 15 minutes.
Troubleshooting Common Issues
If your rolls are leaking cheese during baking, you likely have seal problems. Make sure to pinch the edges firmly and roll them slightly tighter next time. For soggy bottoms, try baking on a preheated pizza stone or using a darker baking sheet which conducts heat better. If your garlic butter is burning rather than browning, your oven might be running hot—reduce the temperature by 25 degrees and monitor closely. And if the dough seems too sticky to work with, don’t add too much flour; instead, chill it for 15 minutes to firm up slightly.
Frequently Asked Questions
Can I make these Pizza Rolls with Mozzarella and Garlic Butter ahead of time?
Absolutely! Prepare them up to the point of baking, cover tightly with plastic wrap, and refrigerate for up to 24 hours. Let them sit at room temperature for 20 minutes before baking.
What’s the best cheese to use if I don’t have mozzarella?
Provolone makes an excellent substitute with similar melting properties. For more flavor, try a mix of fontina and parmesan, or even a mild cheddar if that’s what you have on hand.
Can I use store-bought pizza sauce instead of marinara?
Yes! Pizza sauce works perfectly. It’s typically a bit thicker than marinara, which can actually help prevent leakage during baking.
How do I prevent the bottoms from getting soggy?
Bake on the lower rack of your oven and consider using a preheated baking stone or dark metal sheet pan, which conducts heat better and creates crispier bottoms.
Are these suitable for vegetarians?
The classic version is vegetarian-friendly. Just ensure your parmesan (if using) contains vegetarian rennet, or substitute with a vegetarian hard cheese alternative.
Final Thoughts
These Pizza Rolls with Mozzarella and Garlic Butter have become my signature dish for good reason—they bring together everything we love about comfort food in perfect, bite-sized packages. There’s something truly special about sharing food made with love, and these rolls never fail to create moments of joy around my table. The combination of golden, buttery exteriors and gooey, cheesy centers makes them irresistible to everyone from kids to culinary snobs. I hope you’ll try them and discover your own perfect variation! For more inspiration, check out my Pinterest collection where I share all my favorite comfort food creations.