

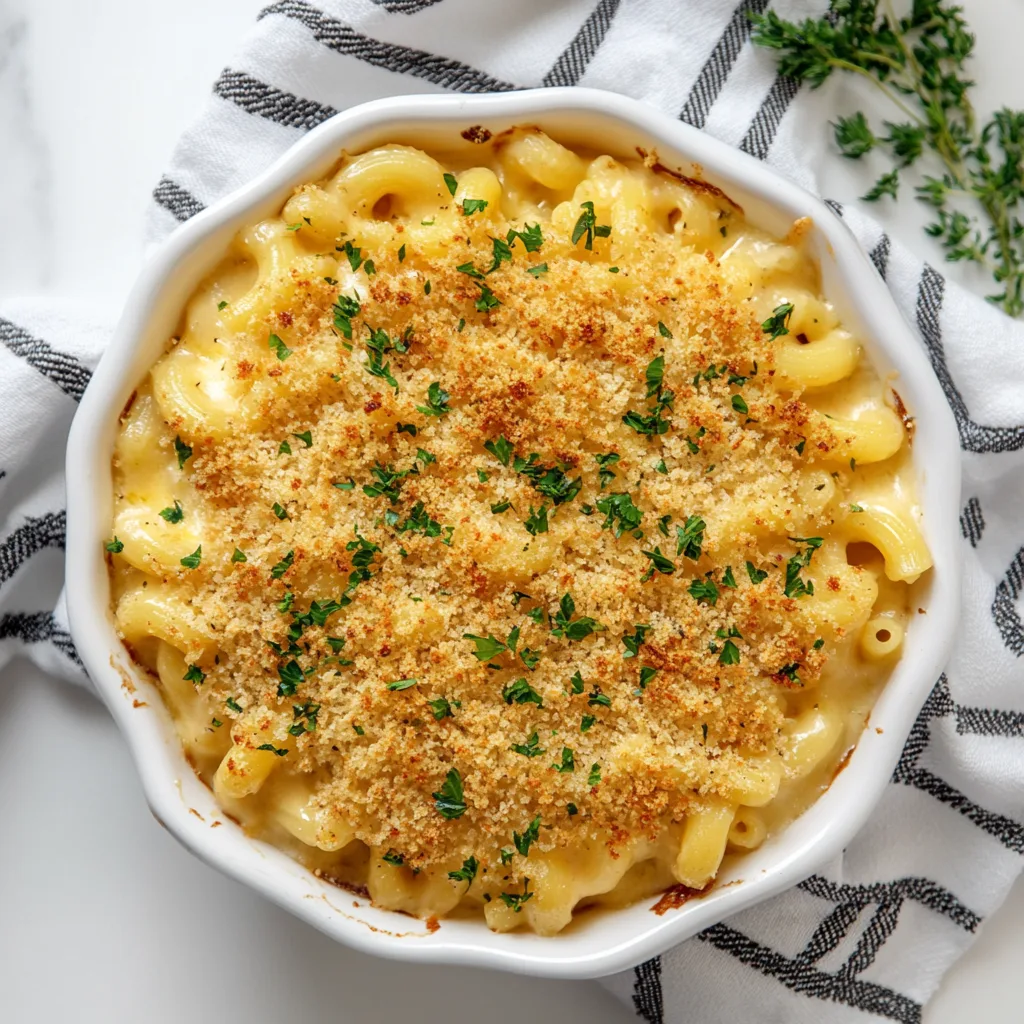
Baked Macaroni and Cheese with Crispy Panko Topping is the ultimate comfort food that wraps you in a warm hug on chilly evenings. There’s something magical about pulling a bubbling dish from the oven, the cheese stretching in golden strands as you serve that first scoop. My version combines creamy, velvety cheese sauce with perfectly cooked pasta, all crowned with a buttery, crisp panko topping that adds the most satisfying crunch. It’s the dish I reach for when I need something that feels like home – simple yet spectacular.
Table of Contents
Recipe
Print
Baked Macaroni and Cheese with Crispy Panko Topping | Creamy & Crunchy Comfort Food Recipe
- Prep Time: 15 minutes
- Cook Time: 25 minutes
- Total Time: 40 minutes
- Yield: 4 servings
- Category: Side Dish, Comfort Food, Casserole
- Method: Baked
- Cuisine: American
- Diet: Vegetarian
Description
This Baked Macaroni and Cheese is ultra creamy, loaded with rich cheddar, and finished with a golden, buttery panko topping. A comforting classic that’s perfect as a main or side dish.
Ingredients
8 oz elbow macaroni (about 2 cups dry)
2 tbsp unsalted butter
2 tbsp all-purpose flour
2 cups whole milk, warmed
1 cup shredded sharp cheddar cheese
1 cup shredded mozzarella cheese
1/2 tsp salt
1/4 tsp black pepper
1/4 tsp paprika (optional)
**Panko Topping:**
3/4 cup panko breadcrumbs
1 tbsp melted butter
1 tbsp grated Parmesan cheese (optional)
Instructions
1. Preheat oven to 375°F (190°C). Grease an 8×8 or similar baking dish.
2. Cook macaroni according to package instructions; drain and set aside.
3. In a saucepan, melt butter over medium heat. Whisk in flour and cook for 1 minute.
4. Slowly whisk in warm milk, stirring constantly until smooth and thickened, about 3–5 minutes.
5. Reduce heat to low and stir in cheddar, mozzarella, salt, pepper, and paprika. Stir until melted.
6. Add cooked pasta to the cheese sauce and stir to coat well.
7. Pour mixture into prepared baking dish.
8. In a small bowl, mix panko with melted butter and Parmesan (if using).
9. Sprinkle evenly over mac and cheese.
10. Bake for 20–25 minutes until bubbly and topping is golden. Let rest 5 minutes before serving.
Notes
Use a mix of cheeses like Gruyère or fontina for added depth.
To make ahead, assemble and refrigerate unbaked; add topping just before baking.
Add cooked bacon, jalapeños, or diced tomatoes for a twist.
Why You’ll Love This Baked Macaroni and Cheese with Crispy Panko Topping
Perfect Texture Contrast
The texture contrast in this mac and cheese is what makes it truly special. The interior is luxuriously creamy, with each pasta piece thoroughly coated in rich cheese sauce that clings to every curve and crevice. But it’s the golden panko topping that takes it to another level – crispy, buttery, and perfectly toasted. I love that first bite where you break through the crunchy layer into the velvety pasta below. It’s like having two distinct experiences in one dish, and that textural play keeps you coming back for “just one more bite” until suddenly, half the casserole is gone!
Rich, Complex Flavor Profile
The flavor depth in this mac and cheese comes from layering different cheeses and seasonings. Sharp cheddar provides that classic tangy backbone, while creamy Gruyère adds nutty sophistication. A touch of mustard powder cuts through the richness, and a whisper of nutmeg brings warmth without being identifiable. The panko topping isn’t just about texture—it’s also toasted in butter with garlic and herbs, creating an aromatic crust that perfumes the entire kitchen as it bakes. When you pull it from the oven, the smell alone is enough to make your mouth water uncontrollably.
Essential Tips & Tricks
The Perfect Cheese Sauce Technique
The secret to silky-smooth cheese sauce is patience and temperature control. Start with a proper roux—equal parts butter and flour cooked until it smells nutty but hasn’t browned. Warm your milk separately before adding it gradually, whisking constantly to prevent lumps. The most crucial step? Remove the sauce from heat before adding cheese. The residual heat will melt it perfectly without risk of breaking or graininess. I always grate my cheese fresh rather than using pre-shredded, which contains anti-caking agents that can make your sauce grainy. Trust me, those extra few minutes with the grater make all the difference.
Perfecting Your Panko Topping
The golden crust on top is what elevates this from stovetop mac to baked perfection. I pre-toast my panko in butter with minced garlic, dried herbs, and a pinch of salt before sprinkling it over the mac and cheese. This extra step ensures the topping browns evenly without overcooking the pasta beneath. Spread it in an even layer, but don’t press down—you want those airy crumbs to maintain their individual texture. For an extra-crispy finish, place the baking dish under the broiler for the final 1-2 minutes, watching carefully to prevent burning. The result is a topping that shatters delicately with each forkful.
Serving Ideas & Creative Variations
Complementary Side Dishes
This baked macaroni and cheese pairs beautifully with bright, acidic sides that cut through its richness. I love serving it alongside a simple arugula salad with lemon vinaigrette or roasted Brussels sprouts with a balsamic glaze. The contrast of flavors keeps your palate engaged and prevents the richness from becoming overwhelming. For a complete comfort food experience, crispy fried chicken or slow-roasted brisket make hearty companions. And don’t forget a side of quick-pickled vegetables—the tangy crunch provides the perfect counterpoint to the creamy, cheesy pasta. The balance of flavors creates a meal that feels both indulgent and thoughtfully composed.
Exciting Flavor Twists
Transform this classic into something new by playing with the flavor components. For a smoky version, add crispy bacon bits and smoked Gouda to the cheese blend. Spice-lovers can stir in diced jalapeños, a dash of cayenne, and pepper jack cheese for a kicky Southwest variation. For an elevated truffle version, mix a teaspoon of truffle oil into the sauce and top with wild mushrooms. Feeling coastal? Fold in lump crabmeat and Old Bay seasoning. My personal favorite twist is a French onion version—caramelized onions folded into the pasta with Gruyère and thyme in the topping. Each variation maintains the soul of the dish while offering a new experience.
Storage & Troubleshooting Guide
Proper Storage & Reheating
Proper storage ensures this mac and cheese remains delicious for days. Let leftovers cool completely before covering with foil or transferring to airtight containers. Refrigerate for up to 4 days. For reheating, add a splash of milk to restore creaminess, then warm in a 325°F oven, covered with foil. Remove the foil for the last few minutes to re-crisp the topping. For single servings, microwave at 50% power with a tablespoon of milk, stirring halfway through. Avoid freezing the fully assembled dish—the texture suffers dramatically. Instead, freeze just the sauce in portions, then make fresh pasta and topping when ready to serve.
Fixing Common Problems
The most common issue with baked mac and cheese is graininess. If your sauce breaks, try whisking in a tablespoon of lemon juice or cream while gently reheating. Too dry? A splash of warm milk worked in gradually will bring back the creaminess. If your topping burns before the center is hot, cover with foil next time and remove only for the final 10 minutes. For soupy mac and cheese, let it rest 15 minutes after baking—it will thicken as it cools. If your pasta is mushy, try undercooking it by 2 minutes before assembling. Remember that mac and cheese continues cooking in the oven, so starting with firmer pasta ensures the perfect final texture.
Frequently Asked Questions
Can I make Baked Macaroni and Cheese with Crispy Panko Topping ahead of time?
Yes! Assemble everything except the topping, cover and refrigerate up to 24 hours. Add the panko mixture just before baking, and add 10-15 minutes to the baking time since you’re starting with a cold dish.
What’s the best cheese combination to use?
I recommend a mix of sharp cheddar for classic flavor, Gruyère for nuttiness, and a touch of mozzarella for stretch. Aim for at least two types of cheese for complexity, with one being a good melter.
Can I make this gluten-free?
Absolutely! Use gluten-free pasta (cook it 1 minute less than package directions), substitute cornstarch for flour in the roux, and use gluten-free panko or crushed rice Chex for the topping.
Why is my cheese sauce grainy?
This typically happens when cheese is added to too-hot liquid or cooked at too high a temperature. Always remove from heat before adding cheese and grate it yourself rather than using pre-shredded.
How can I make this healthier?
Try whole grain pasta, reduce cheese by 25% while adding puréed cauliflower to the sauce, use low-fat milk, and top with a mixture of panko and finely chopped nuts for added nutrients.
Final Thoughts
This Baked Macaroni and Cheese with Crispy Panko Topping isn’t just a recipe—it’s a canvas for creativity and a vehicle for comfort. The contrast between the crunchy, golden topping and the creamy pasta beneath creates something truly magical in its simplicity. I love how this dish brings people together, quieting dinner tables as everyone savors that first perfect bite. Whether you follow my recipe exactly or use it as inspiration for your own signature version, I hope it brings as much joy to your table as it has to mine. For more cozy recipes that warm both heart and home, visit my Pinterest collection.